


Integrating AbuseIPDB with OpenCTI - Enhance IP Intelligence
Integrating AbuseIPDB with OpenCTI - Enhance IP Intelligence
AbuseIPDB + OpenCTI Integration Tutorial
- Pre-Requisites
- Introduction
- AbuseIPDB OpenCTI connectors
- AbuseIPDB Blacklist external-import connector
- Customizing AbuseIPDB blacklist endpoint for OpenCTI connector
- Configure the AbuseIPDB Blacklist external-import connector
- Post-Installation and running the AbuseIPDB blacklist OpenCTI connector
- AbuseIPDB Check internal-enrichment connector
- Configure the AbuseIPDB Check internal-enrichment OpenCTI connector
- Post-installation and running the AbuseIPDB check internal-enrichment OpenCTI connector
- Troubleshooting Connectors With Docker
- Conclusion
- Page Feedback
1.) Pre-Requisites:
- An AbuseIPDB API account
- OpenCTI release version 6.0.1 NOTE: At the time of writing, the latest OpenCTI release is 6.2.0
This tutorial assumes that you have at least one device with the OpenCTI Platform installed, and any number of OpenCTI workers. If you do not have an OpenCTI instance, you can use the official Docker image. You can find the official Docker image here: OpenCTI Docker.
For more info refer to the official OpenCTI documentation: OpenCTI Documentation, or checkout the source code for the OpenCTI platform, which is available on Github. .
2.) Introduction:
Note: If you are already familiar with OpenCTI and AbuseIPDB, you can skip the overview, or use the table of contents to navigate to the section you need.
AbuseIPDB provides a free API for reporting and checking IP addresses. Every day webmasters, system administrators, and other IT professionals work with our API to report thousands of IP addresses engaging in spamming, hacking, vulnerability scanning, and other malicious activity in real time.
OpenCTI, or, "The OpenCTI project (Open Cyber Threat Intelligence)" is a platform meant for processing and sharing knowledge for cyber threat intelligence purposes. It has been developed by the French national cybersecurity agency (ANSSI) along with the CERT-EU (Computer Emergency Response Team of the European Union). It was initially designed to develop and facilitate ANSSI’s interactions with its partners. Today, the platform has been fully released in open source and made available to the entire cyber threat intelligence community, in order to allow the actors to structure, store, organize, visualize and share their knowledge.
This tutorial will cover integrating your OpenCTI instance, with your AbuseIPDB account using OpenCTI connectors and the AbuseIPDB API. Allowing you to harness AbuseIPDB's IP reputation services to reinforce OpenCTI's threat intelligence capabilities. First, leverage thousands of malicious IP addresses using the blacklist endpoint external-import connector. Second, add detailed intelligence to your organization's network security through the check endpoint internal-enrichment connector. By adding a few lines of Docker code to your docker-compose.yml, you should be able to start harnessing OpenCTI and AbuseIPDB as one super cybersecurity tool in a matter of minutes.
3.) Connecting AbuseIPDB with OpenCTI
This tutorial assumes you are using the OpenCTI Docker instance. That assumption is made because the Docker instance is the most common way to run OpenCTI. There is the option to run the python source code, for both the OpenCTI platform and the connectors. However, this tutorial will only cover the Docker instance.
NOTE: While not explicitly designed for the python source code, the same principles apply. The values for the environment variables are the same, whether you are using Docker and an .env file, or python and a config.yml file.
When referring to the OpenCTI docker-compose.yml file, we are referring to the file that is used to start the OpenCTI platform and its workers. This file is typically the docker-compose.yml located in the root directory of your cloned or forked OpenCTI Docker github repository.
In the OpenCTI platform, connectors can be used to link OpenCTI with other cybersecurity systems, including AbuseIPDB, MISP, Mitre, and more. These connectors are their own Docker containers, categorized by functionality, such as internal-enrichment, external-import, stream, and others. This tutorial covers the two AbuseIPDB OpenCTI connectors, the internal-enrichment connector and the external-import connector, as they are the two connectors available on Github at the time of writing.
- External Import Connectors: These connectors are used to import new data into OpenCTI from external sources. For example, the AbuseIPDB external-import connector can be used to fetch a list of blacklisted IP addresses from AbuseIPDB and create new indicators, objects, or entities, in OpenCTI based on this information.
- Internal Enrichment Connectors: These connectors are used to enrich existing data in OpenCTI with information from external sources. For example, the AbuseIPDB internal enrichment connector can be used to check the reputation of IP addresses already present in OpenCTI and update threat scores based on the information retrieved from AbuseIPDB.
For more information, you can refer to the official OpenCTI documentation on connectors.
To use the OpenCTI connectors, clone or fork the official OpenCTI connectors repository OpenCTI Connectors Official Github .
4.) Customizing AbuseIPDB blacklist endpoint for OpenCTI connector
The connector can be found in the official OpenCTI connectors repository, OpenCTI AbuseIPDB Blacklist Connector.
A basic blacklist containing the top 10,000 abusive IPs is available to all AbuseIPDB users. Users with an AbuseIPDB subscription can customize the blacklist, and include a larger amount of IP addresses.
- Free: Up to 10,000 IPs, customization parameters not available
- Basic: Up to 100,000 IPs, customization available
- Premium: Up to 500,000 IPs, customization available
Free AbuseIPDB Account:
With a Free account, you have access to a blacklist that includes the top 10,000 abusive IPs in the AbuseIPDB database, which are all likely to have a 100% Abuse Confidence Score.
OpenCTI interacts with the AbuseIPDB API to fetch information through the JSON and STIX data formats. The AbuseIPDB API will return json data, which the connectors convert to STIX data, and import into OpenCTI. STIX is a security standard that allows organizations to share threat intelligence data in a standardized format. It is similar to JSON, but with a specific structure that is used.
Basic or Premium AbuseIPDB Account:
With a Basic or Premium account, you have access to some additional customization parameters, and a larger Blacklist size.
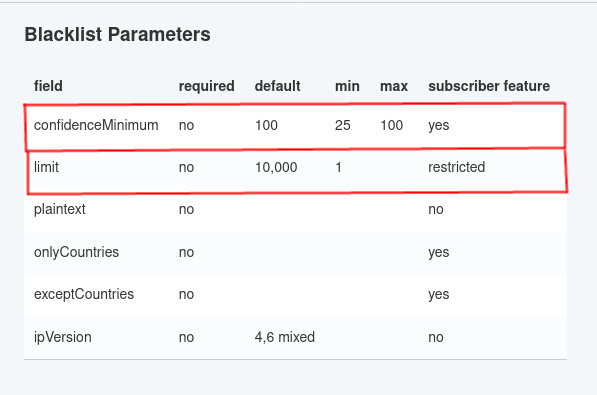
Popular AbuseIPDB blacklist customization parameters include:
- confidenceMinimum: Minimum Abuse Confidence Score to include in your blacklist (from 25 - 100). To avoid risk of false positives, we recommend setting a confidenceMinimum of at least 75 or higher. In the OpenCTI connector, the default is 100, but the range is the same range as the blacklist endpoint (from 25 - 100).
-
limit: Make sure you keep track of
how fast data is being collected,
and the rate of API calls.
- Note: the account-level limitations based on your AbuseIPDB plan, OpenCTI is capable of importing massive amounts of data quickly, so use with caution. Because of this, if your AbuseIPDB subscription is downgraded in the future, the number of IPs returned by your Blacklist query may be capped, but your integration will still function but according to the basic plan.
For more information about the blacklist endpoint and it's parameters refer to the official AbuseIPDB blacklist endpoint documentation.
5.) Configure the External Import AbuseIPDB Blacklist Connector
Configure the docker-compose.yml
You can download, or just copy, the contents of the docker-compose.yml from the web, then add, or paste, this section into your original OpenCTI docker-compose.yml file. There should already be connectors in the docker-compose.yml file. Under the default connectors, you can easily add the AbuseIPDB blacklist connector to the docker-compose.yml file by adding this docker code:
            connector-abuseipdb-ipblacklist:
            image: opencti/connector-abuseipdb-ipblacklist:latest
            environment:
              - OPENCTI_URL=http://opencti:8080
              - OPENCTI_TOKEN=${OPENCTI_ADMIN_TOKEN}
              - CONNECTOR_ID=${CONNECTOR_ABUSEIPDB_IPBLACKLIST} # Valid UUIDv4
              - CONNECTOR_TYPE=EXTERNAL_IMPORT
              - CONNECTOR_NAME=AbuseIPDBIPBlacklist
              - CONNECTOR_SCOPE=application/json
              - CONNECTOR_CONFIDENCE_LEVEL=100 # From 0 (Unknown) to 100 (Fully trusted)
              - CONNECTOR_LOG_LEVEL=info
              - ABUSEIPDB_API_KEY=${ABUSEIPDB_API_KEY}
              - ABUSEIPDB_SCORE=100
              - ABUSEIPDB_LIMIT=100
              - ABUSEIPDB_INTERVAL=1
              - ABUSEIPDB_URL=https://api.abuseipdb.com/api/v2/blacklist
            restart: always
            depends_on:
              - opencti
Details on AbuseIPDB Connectors environment variables (.env)
In the compose file we used several variables. We need to add those same variables to the .env file. You can use the below script to generate your .env file. You are also free to change .env values manually or use or change the provided script to generate a new .env file. The script is a simple way to generate a .env file with random UUIDv4 values.
                #!/bin/bash
                # Create a .env file for OpenCTI and AbuseIPDB Connectors
                (cat << EOF
                [email protected]
                OPENCTI_ADMIN_PASSWORD=ChangeMe
                OPENCTI_ADMIN_TOKEN=$(cat /proc/sys/kernel/random/uuid)
                OPENCTI_BASE_URL=http://localhost:8080
                MINIO_ROOT_USER=$(cat /proc/sys/kernel/random/uuid)
                MINIO_ROOT_PASSWORD=g
                RABBITMQ_DEFAULT_USER=guest
                RABBITMQ_DEFAULT_PASS=guest
                ELASTIC_MEMORY_SIZE=8G
                CONNECTOR_HISTORY_ID=$(cat /proc/sys/kernel/random/uuid)
                CONNECTOR_EXPORT_FILE_STIX_ID=r$(cat /proc/sys/kernel/random/uuid)
                CONNECTOR_EXPORT_FILE_CSV_ID=$(cat /proc/sys/kernel/random/uuid)
                CONNECTOR_IMPORT_FILE_STIX_ID=$(cat /proc/sys/kernel/random/uuid)
                CONNECTOR_EXPORT_FILE_TXT_ID=$(cat /proc/sys/kernel/random/uuid)
                CONNECTOR_IMPORT_DOCUMENT_ID=$(cat /proc/sys/kernel/random/uuid)
                SMTP_HOSTNAME=localhost

                #abuseipdb
                ABUSEIPDB_API_KEY=ChangeMeToAbuseIPDBAPIKey
                CONNECTOR_ABUSEIPDB_IPBLACKLIST=$(cat /proc/sys/kernel/random/uuid)
                CONNECTOR_ABUSEIPDB_ID=$(cat /proc/sys/kernel/random/uuid)

                EOF
                ) > .env
NOTE:
- The script above generates a .env file with random UUIDv4 values. You can change the values manually, or use the script to generate a new .env file. The script is a simple way to generate a .env file with random UUIDv4 values. You can also use the script to generate a .env file with your own values.
- Do not forget to change the values in the .env file to your own values.
- This script will overwrite any existing .env file in the directory where it is run. to change this use >> (append) instead of > (overwrite).
Below is a copy of the README.md from the AbuseIPDB blacklist external import connecter:
                # OpenCTI AbuseIPDB IP Blacklist
                The connector uses the AbuseIPDB API to collect IPlist above a specified risk score.
                If you're using a free API key, you must use the 10K limitation in the parameters.

                ### Configuration Details
              | -------------------------------------------------------------------------------------------------------------------------------------------------------------------------------------------------------------------------|
              | Parameter                            | Docker envvar                       | Mandatory    | Description                               | Example Values                                                                   |
              | ------------------------------------ | ----------------------------------- | ------------ | ------------------------------------------|----------------------------------------------------------------------------------|
              | `opencti_url`                        | `OPENCTI_URL`                       | Yes          | The URL of the OpenCTI platform.          | http://opencti.com:8080                                                          |
              | `opencti_token`                      | `OPENCTI_TOKEN`                     | Yes          | The default admin token from OpenCTI      | 9442f5a4-04a6-493b-9fe8-f7586dca40e8                                             |
              | `connector_id`                       | `CONNECTOR_ID`                      | Yes          | A valid arbitrary `UUIDv4`                | 9990738a-b3fa-4f27-a085-0840a90ea939                                             |
              | `connector_name`                     | `CONNECTOR_NAME`                    | Yes          | A valid string                            | John Doe                                                                         |
              | `connector_scope`                    | `CONNECTOR_SCOPE`                   | Yes          | data format                               | application/json                                                                 |
              | `connector_confidence_level`         | `CONNECTOR_CONFIDENCE_LEVEL`        | Yes          | The default confidence level              | 100                                                                              |
              | `connector_log_level`                | `CONNECTOR_LOG_LEVEL`               | Yes          | The log level for this connector          | info, error, debug                                                               |
              | `abuseipdb_url`                      | `ABUSEIPDB_URL`                     | Yes          | the abuse IPDB URL                        | https://api.abuseipdb.com/api/v2/blacklist                                       |
              | `abuseipdb_api_key`                  | `ABUSEIPDB_API_KEY`                 | Yes          | Your Abuse IPDB API KEY                   | c0a0d4535a03e043c3904b1fec74e5fcad1a72412aced0b17113043f39c0da4fefa4d04a84c9088c |
              | `abuseipdb_score`                    | `ABUSEIPDB_SCORE_FILTER`            | Yes          | AbuseIPDB Score Limitation                | 100                                                                              |
              | `abuseipdb_limit`                    | `ABUSEIPDB_LIMIT`                   | Yes          | limit number of result itself             | 10000                                                                            |
              | `abuseipdb_interval`                 | `ABUSEIPDB_INTERVAL`                | Yes          | interval between 2 collect blacklist      | 1                                                                     |
              | -------------------------------------------------------------------------------------------------------------------------------------------------------------------------------------------------------------------------|
The above environment variables must be in the .env file, as they are all mandatory, and are referenced in the docker-compose.yml. You must use the script from before, or manually add these variables yourself to the .env file.
NOTE: You could choose to forgo a .env file entirely. This option is called hardcoding the values, but this is not recommended. API keys and tokens should be kept private. The .env file is a proven way to keep your keys and tokens secure and out of the docker-compose.yml file. You want to track your docker-compose.yml file in a version control system, like Git, and you do not want to expose your keys and tokens to the public. So keep them in the .env file. Choose whatever you need based on your security requirements.Example .env file
            [email protected]
            OPENCTI_ADMIN_PASSWORD=ChangeMe
            OPENCTI_ADMIN_TOKEN=valid-opencti-token #f37b5c10-c0ee-4410-a13e-f5fe84ac2227
            OPENCTI_API_TOKEN=valid-opencti-token #c993f58a-2bb5-416e-9bd3-339a305a0543
            OPENCTI_BASE_URL=http://localhost:8080
            MINIO_ROOT_USER=valid-uuid4 #7d624f04-1881-4bbe-8141-eb2b27dcedd5
            MINIO_ROOT_PASSWORD=valid-uuid4 #6ab16fce-8889-4bdb-90e7-6cd19b578511
            RABBITMQ_DEFAULT_USER=guest
            RABBITMQ_DEFAULT_PASS=guest
            ELASTIC_MEMORY_SIZE=8G
            CONNECTOR_HISTORY_ID=valid-uuid4 #f5ec6ec1-8ad3-4caf-8641-aff516e6c2a7
            CONNECTOR_EXPORT_FILE_STIX_ID=valid-uuid4 #c903629f-d0d7-4987-8a10-95f4a7ca29e5
            CONNECTOR_EXPORT_FILE_CSV_ID=valid-uuid4 #0c173f11-26fd-4df5-9c02-dd44d85ffb29
            CONNECTOR_IMPORT_FILE_STIX_ID=valid-uuid4 #d78a29c6-48bb-42fa-9fe6-f2036c4301fd
            CONNECTOR_EXPORT_FILE_TXT_ID=724722bc-cec9-4beb-b8bb-658ec16f0ab4
            CONNECTOR_IMPORT_DOCUMENT_ID=5648b872-29b3-4fcc-b292-e90d19e01e52
            SMTP_HOSTNAME=localhost

            #abuseipdb
            ABUSEIPDB_API_KEY=77877ba9b2307fd0894180926c83f25ae535537a825b366683ef84a5002e870acf576727713f4585
            CONNECTOR_ABUSEIPDB_IPBLACKLIST=37c5c5fd-e6cb-46f9-93a5-1c62fd95ae83
            CONNECTOR_ABUSEIPDB_ID=c6128848-c0dc-41a5-a7ff-136a8767fc67
Details on AbuseIPDB environment variables (.env)
- OPENCTI_URL: The URL where your OpenCTI platform is accessible. If you're running everything locally and OpenCTI is on port 8080, for connectors, the value http://opencti:8080 should work. It is important in Docker to use http://opencti:8080, instead of http://localhost:8080, as you would in the original docker-compose.yml for the OpenCTI platform. If OpenCTI is hosted elsewhere, replace "opencti" with the appropriate hostname, IP address, and port number.
- OPENCTI_TOKEN: A valid API token for OpenCTI. You need to generate this within the OpenCTI platform under the settings section. Replace ChangeMe with the actual token.
- For info on finding your OpenCTI API Token, check the user settings in your OpenCTI Instance.
- CONNECTOR_ID: A unique identifier for this connector instance, in UUIDv4 format. You can generate a UUIDv4 using various online tools or command-line utilities like uuidgen on Linux and macOS.
- To generate a UUIDv4 from your linux operating system you can also use, cat /proc/sys/kernel/random/uuid.
- If you do not have linux, you can generate a UUIDv4 from the online UUIDv4 Generator , then paste them into your .env file.
- For more info on UUIDv4 check out this UUIDv4 Resource wikipedia page.
- CONNECTOR_NAME: The provided name "AbuseIPDB IP Blacklist" is descriptive, but you can change the name to any valid string.
- CONNECTOR_SCOPE: The scope of the connector, already set to AbuseIPDB, which should be appropriate for the AbuseIPDB IP Blacklist connector.
- CONNECTOR_CONFIDENCE_LEVEL: This confidence level is the confidence level assigned to the data imported by this connector, and the confidence level of the connector itself. You can adjust this based on your individual needs. If you are unsure how to set this value, set it to the same value as the AbuseIPDB score.
- CONNECTOR_LOG_LEVEL: The log level for the connector's output. This is set to error by default. The error setting means only error messages will be logged. Other options include info, debug, etc., Setting this value depends on how much detail you want in the logs.
- ABUSEIPDB_URL: The API endpoint for the AbuseIPDB blacklist, needs to remain the default https://api.abuseipdb.com/api/v2/blacklist. You typically won't need to change this.
- ABUSEIPDB_API_KEY: Your personal API key for AbuseIPDB. You need to replace ABUSEIPDB_API_KEY's value, in the .env file, with your actual AbuseIPDB API key, which you can obtain by registering or logging into the AbuseIPDB website and accessing your account settings.
- ABUSEIPDB_SCORE: The minimum abuse confidence score to retrieve IP addresses from AbuseIPDB is 25. It's set to 100 here, meaning only IPs with a confidence score of 100 will be fetched. A confidence score of 100 is the highest possible score, and AbuseIPDB recommends a minimum of 75 to avoid false positives. Adjust according to your requirements.
- ABUSEIPDB_LIMIT: The maximum number of IP addresses you want to fetch from the blacklist. It's set to 10000, which is the free account limit, and a reasonable default. You can adjust this based on your needs, OpenCTI limits, and your AbuseIPDB account level.
- ABUSEIPDB_INTERVAL: The frequency, in days, with which the connector will fetch updates from the AbuseIPDB blacklist. It's set to 1 day here, meaning the connector will update its data every day.
6.) Post-Installation and Running the AbuseIPDB Blacklist Connector
To begin, go to the login screen of your OpenCTI platform, and enter your credentials. The credentials used here will be the same as the credentials in your .env and docker-compose.yml files.
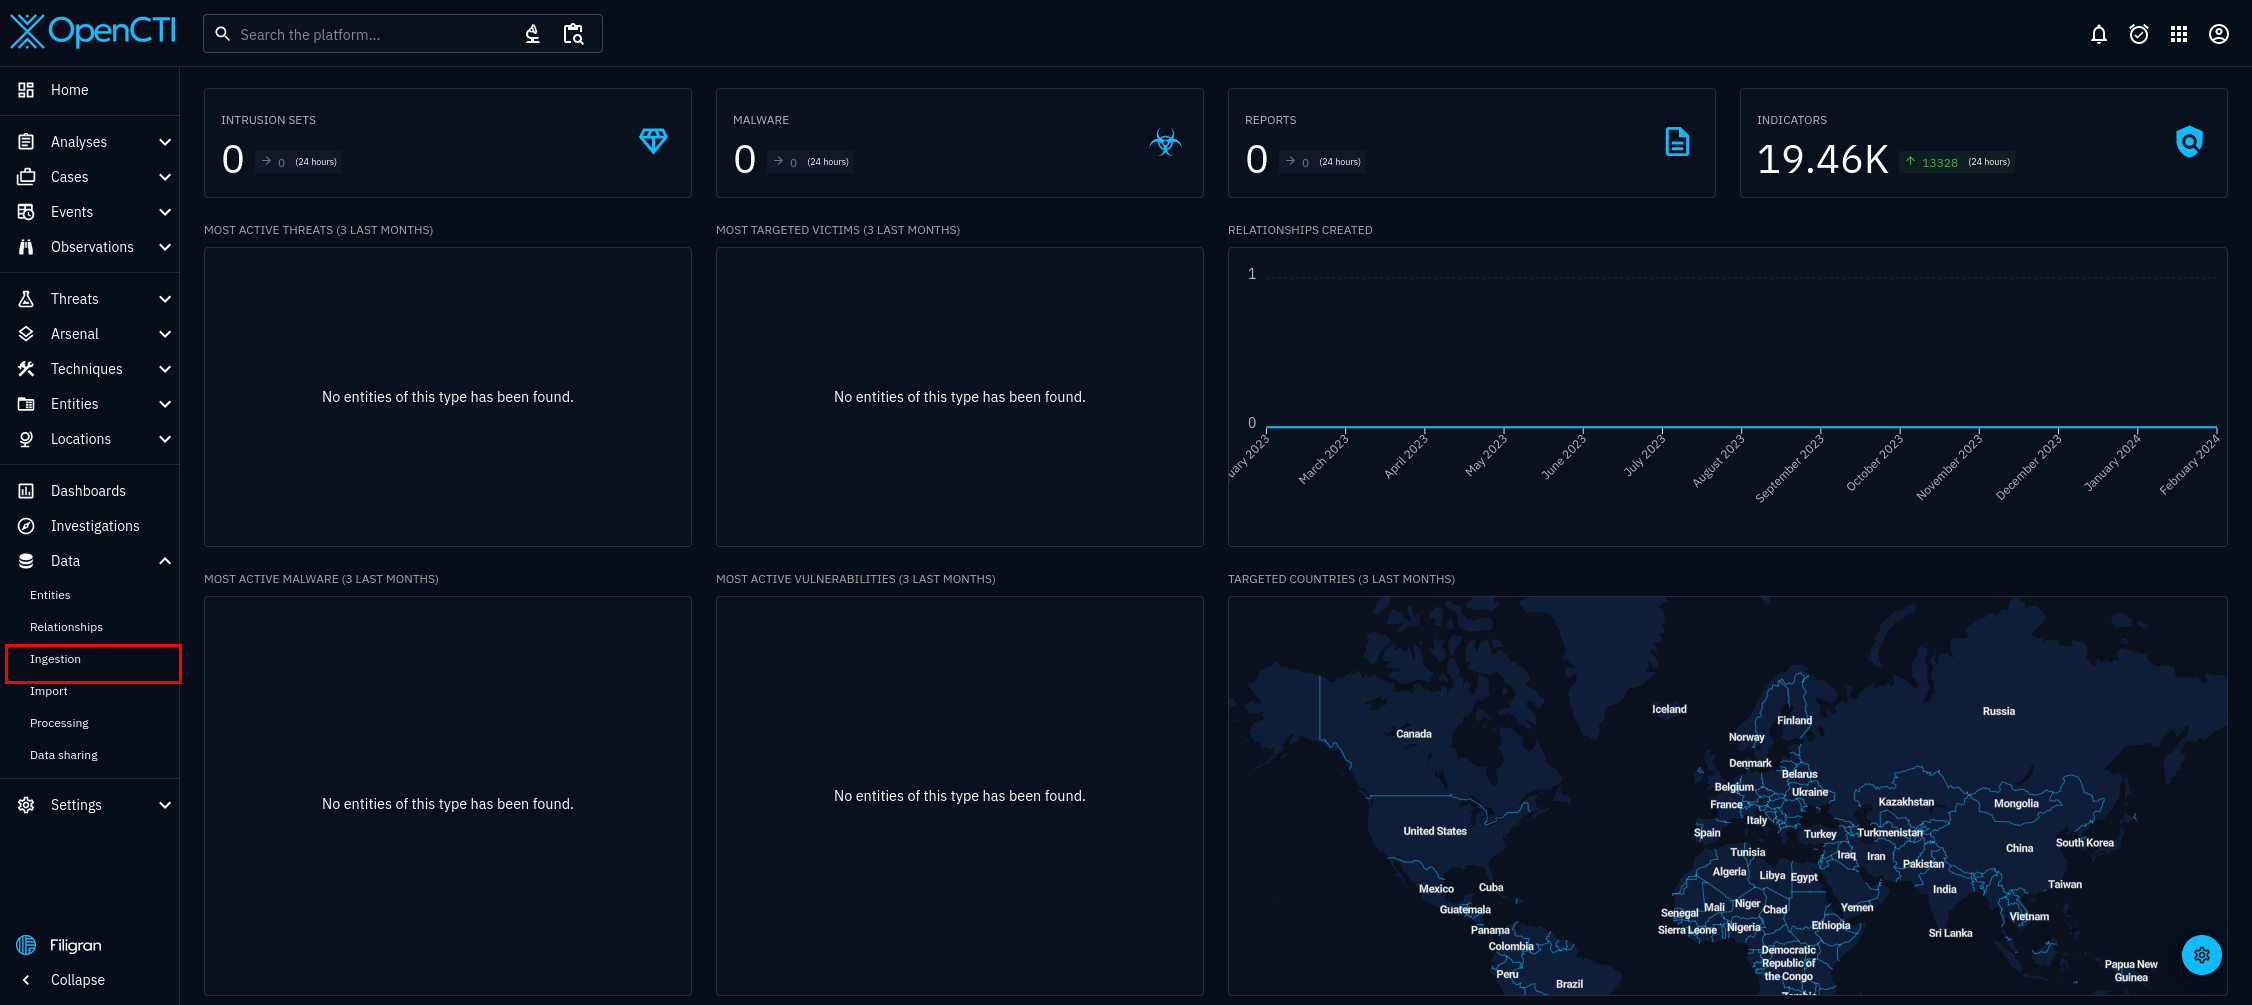
Once you have logged in, you will be taken to the OpenCTI dashboard.
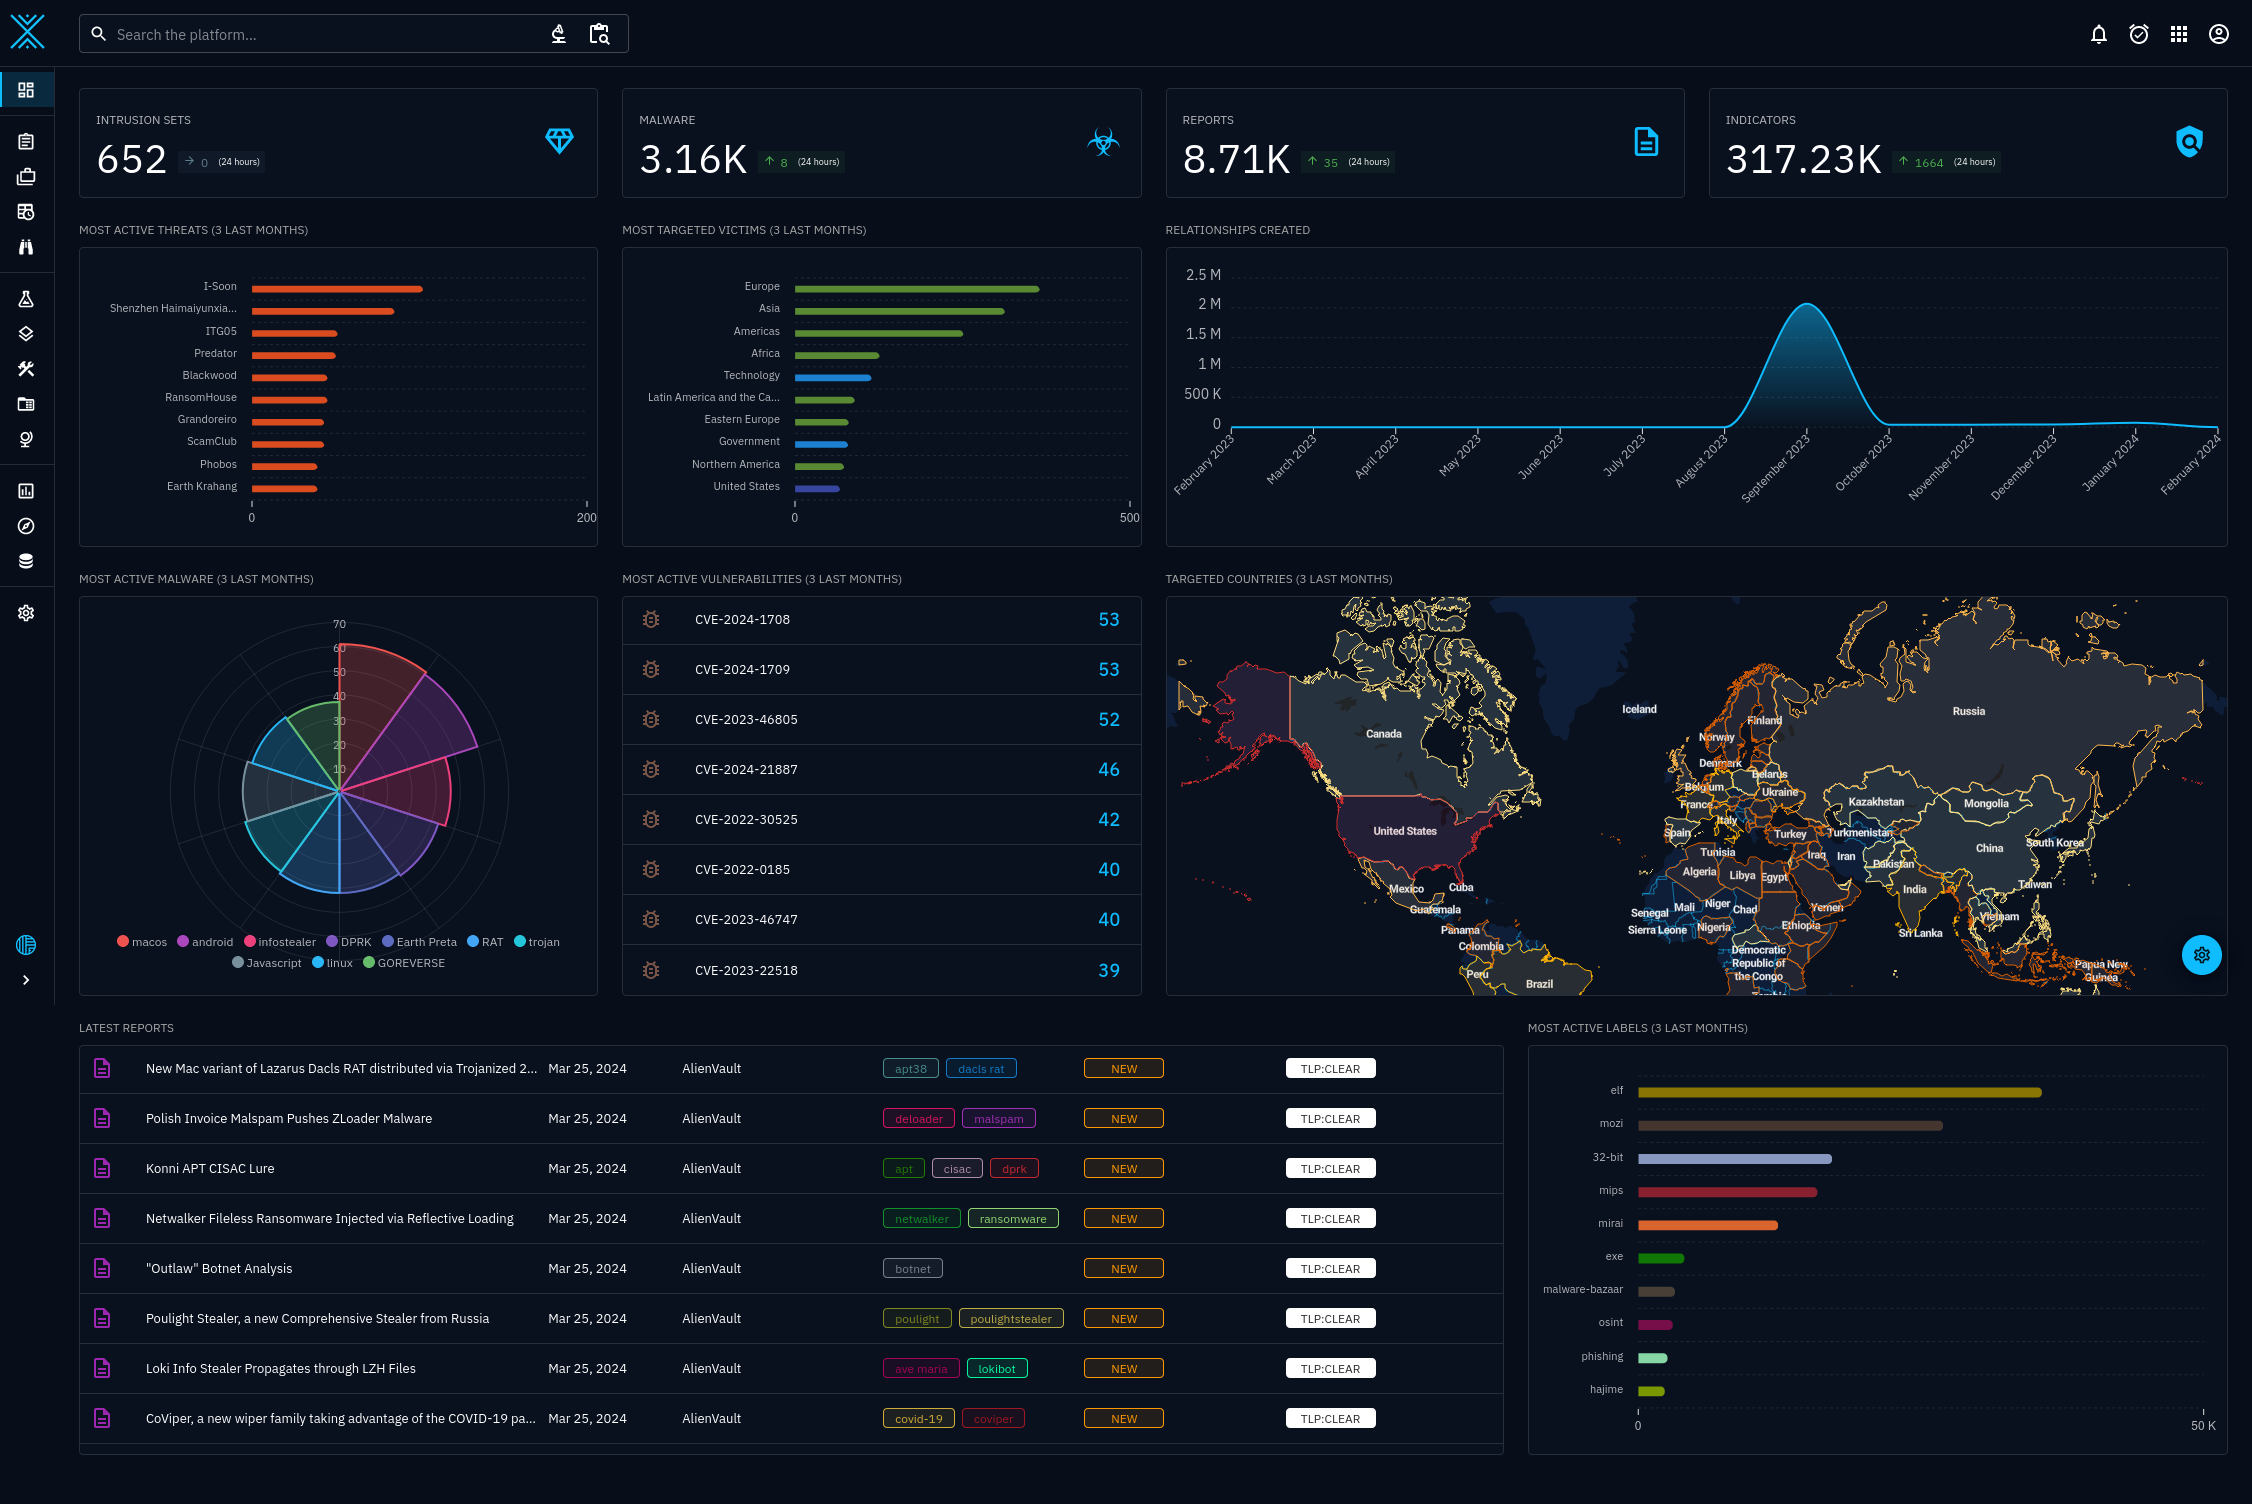
Your dashboard can look as complex as the above image, or as simple as the below image. The connectors will work either way.
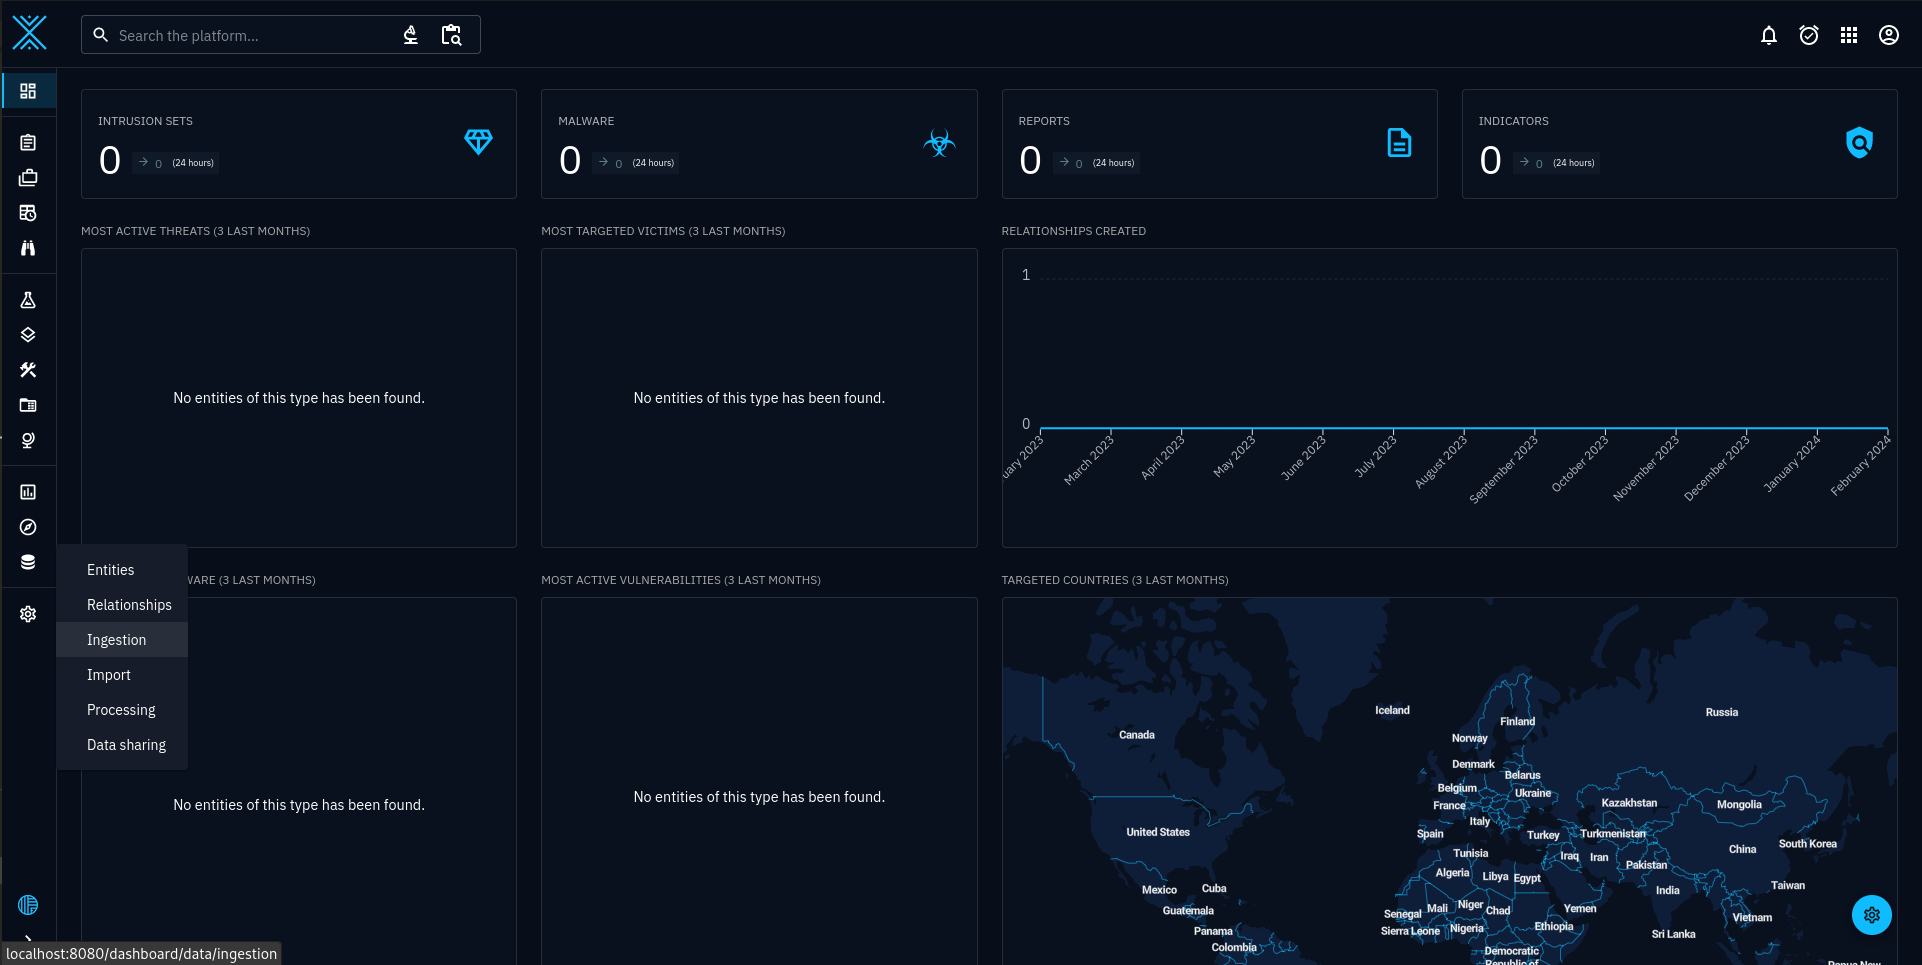
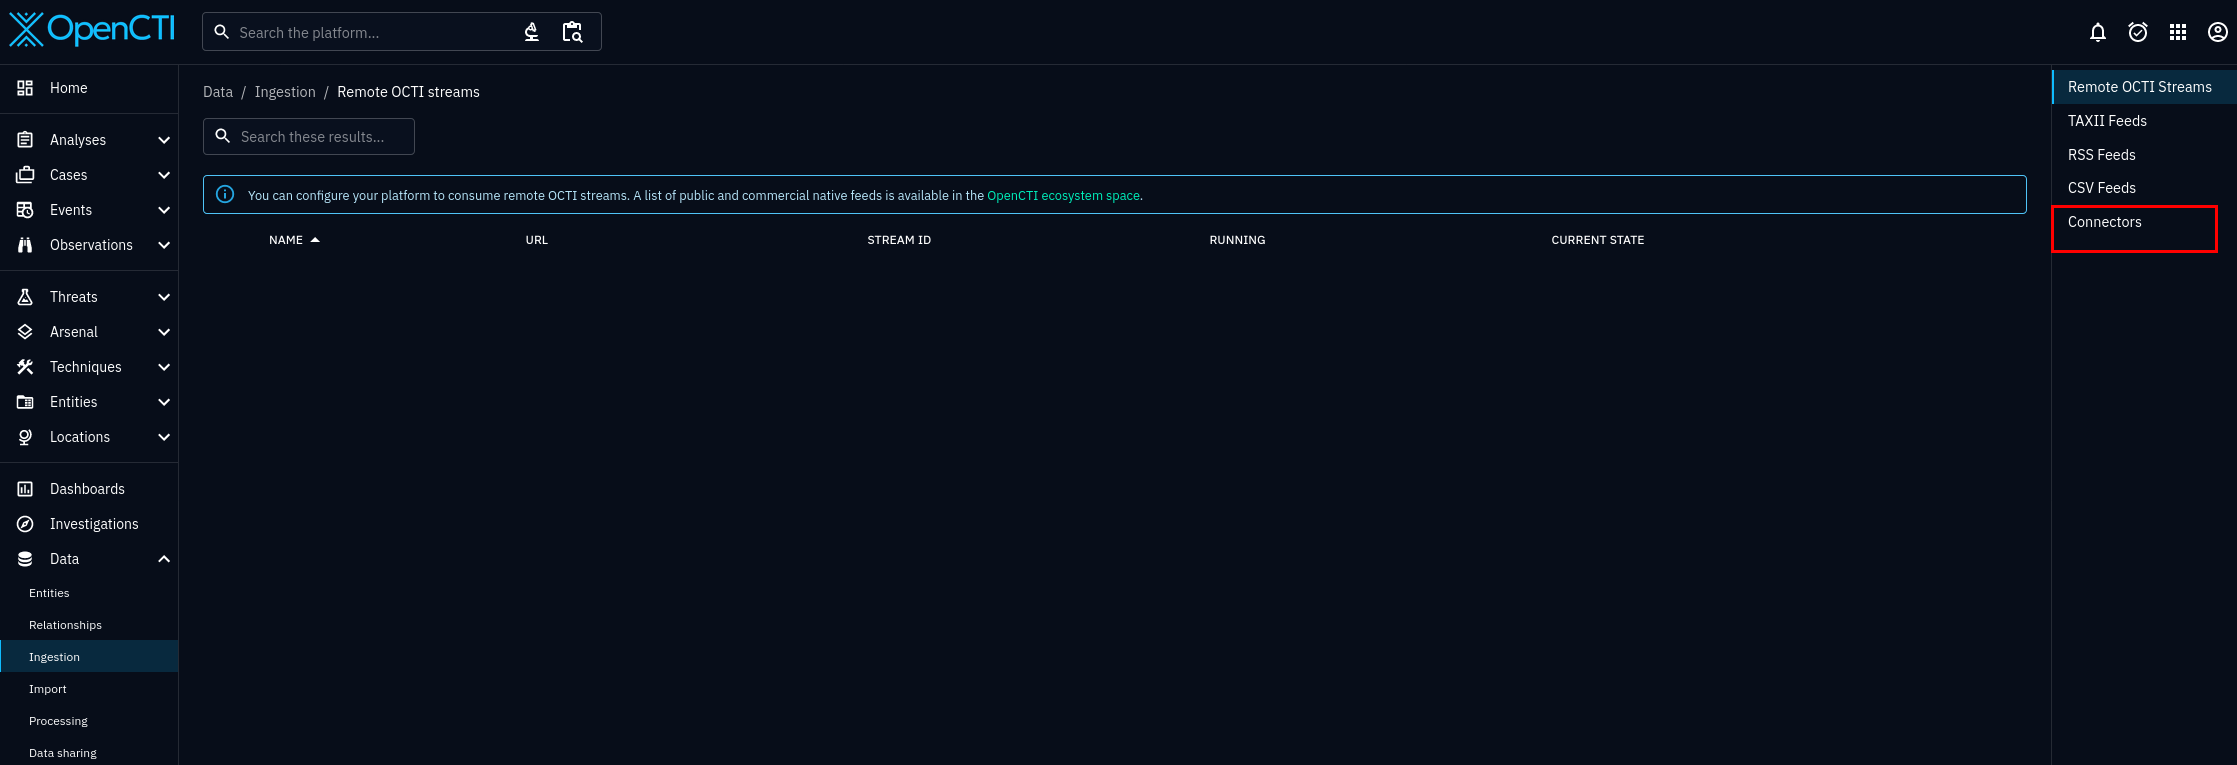
To verify the connectors are working, select, Data > Ingestion. See figure 3.
Select connectors, it is the fourth option, on the right hand side. See figure 4.
Check whether "AbuseIPDB IP Blacklist" connector is listed. The name may be different, since it will match whichever name you gave in the docker-compose.yml, or .env file.
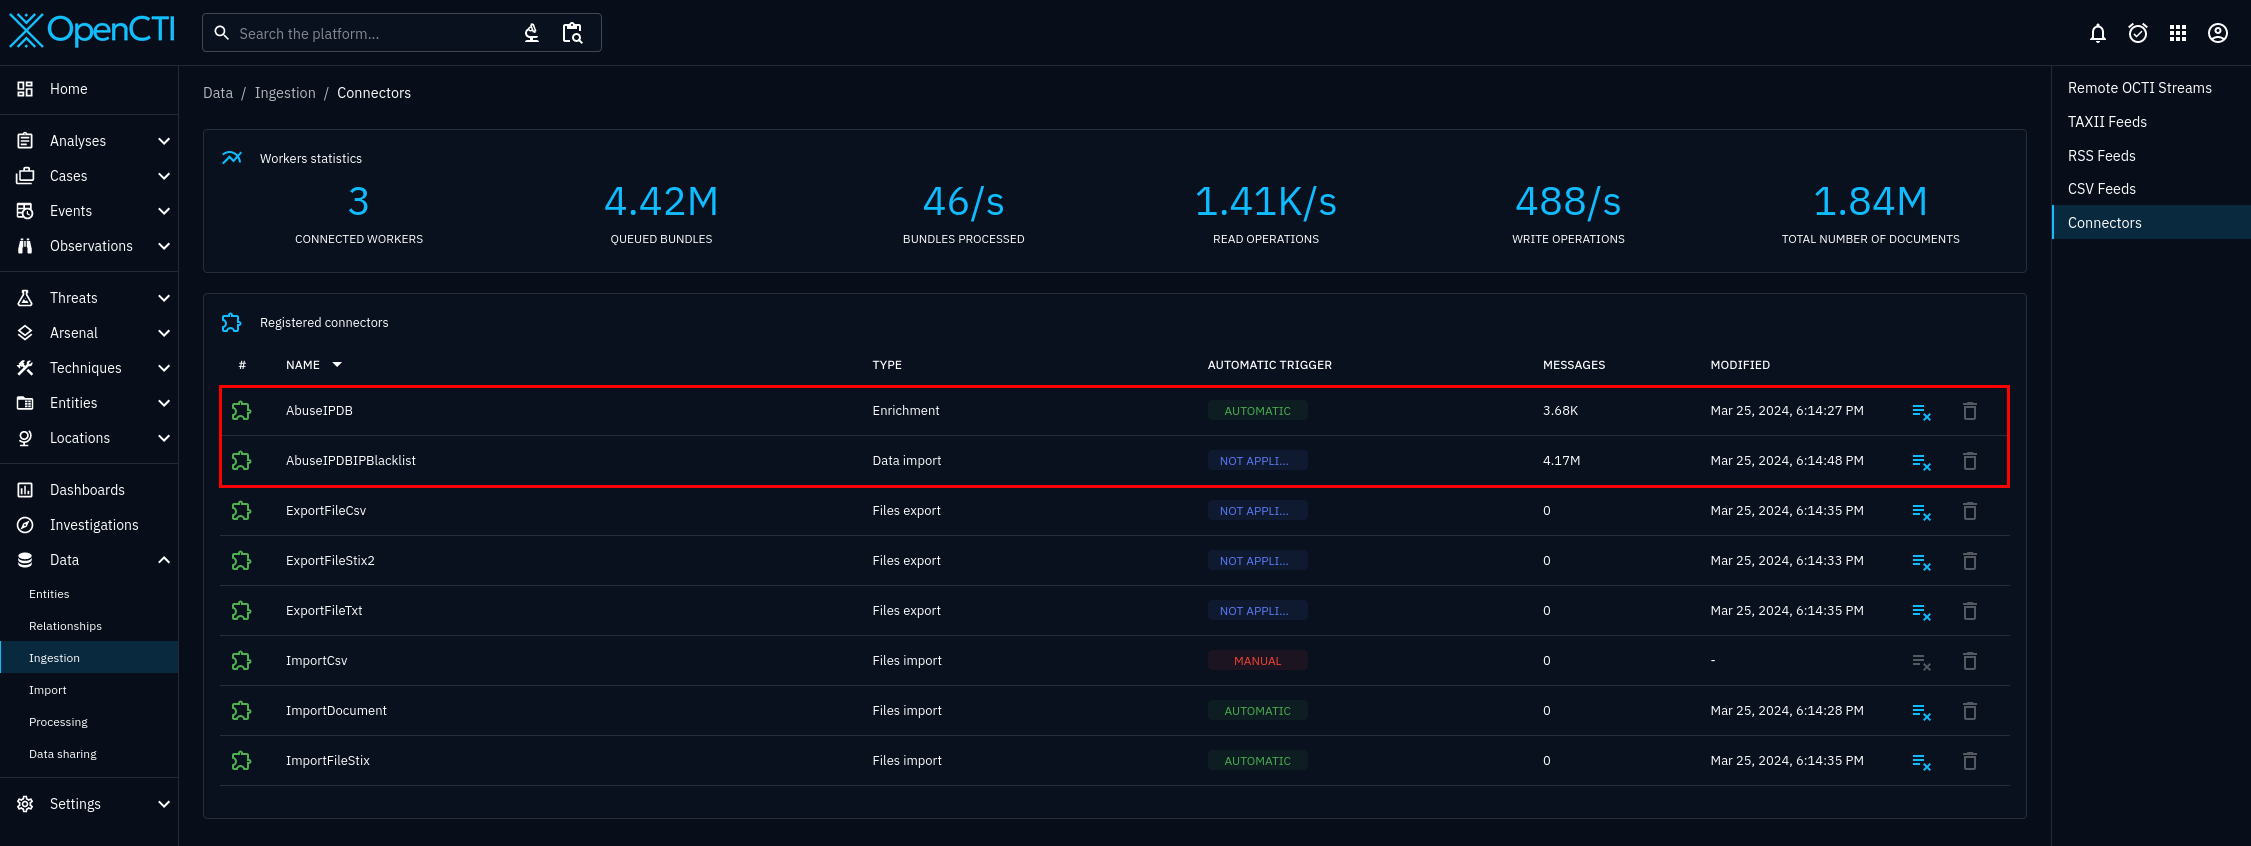
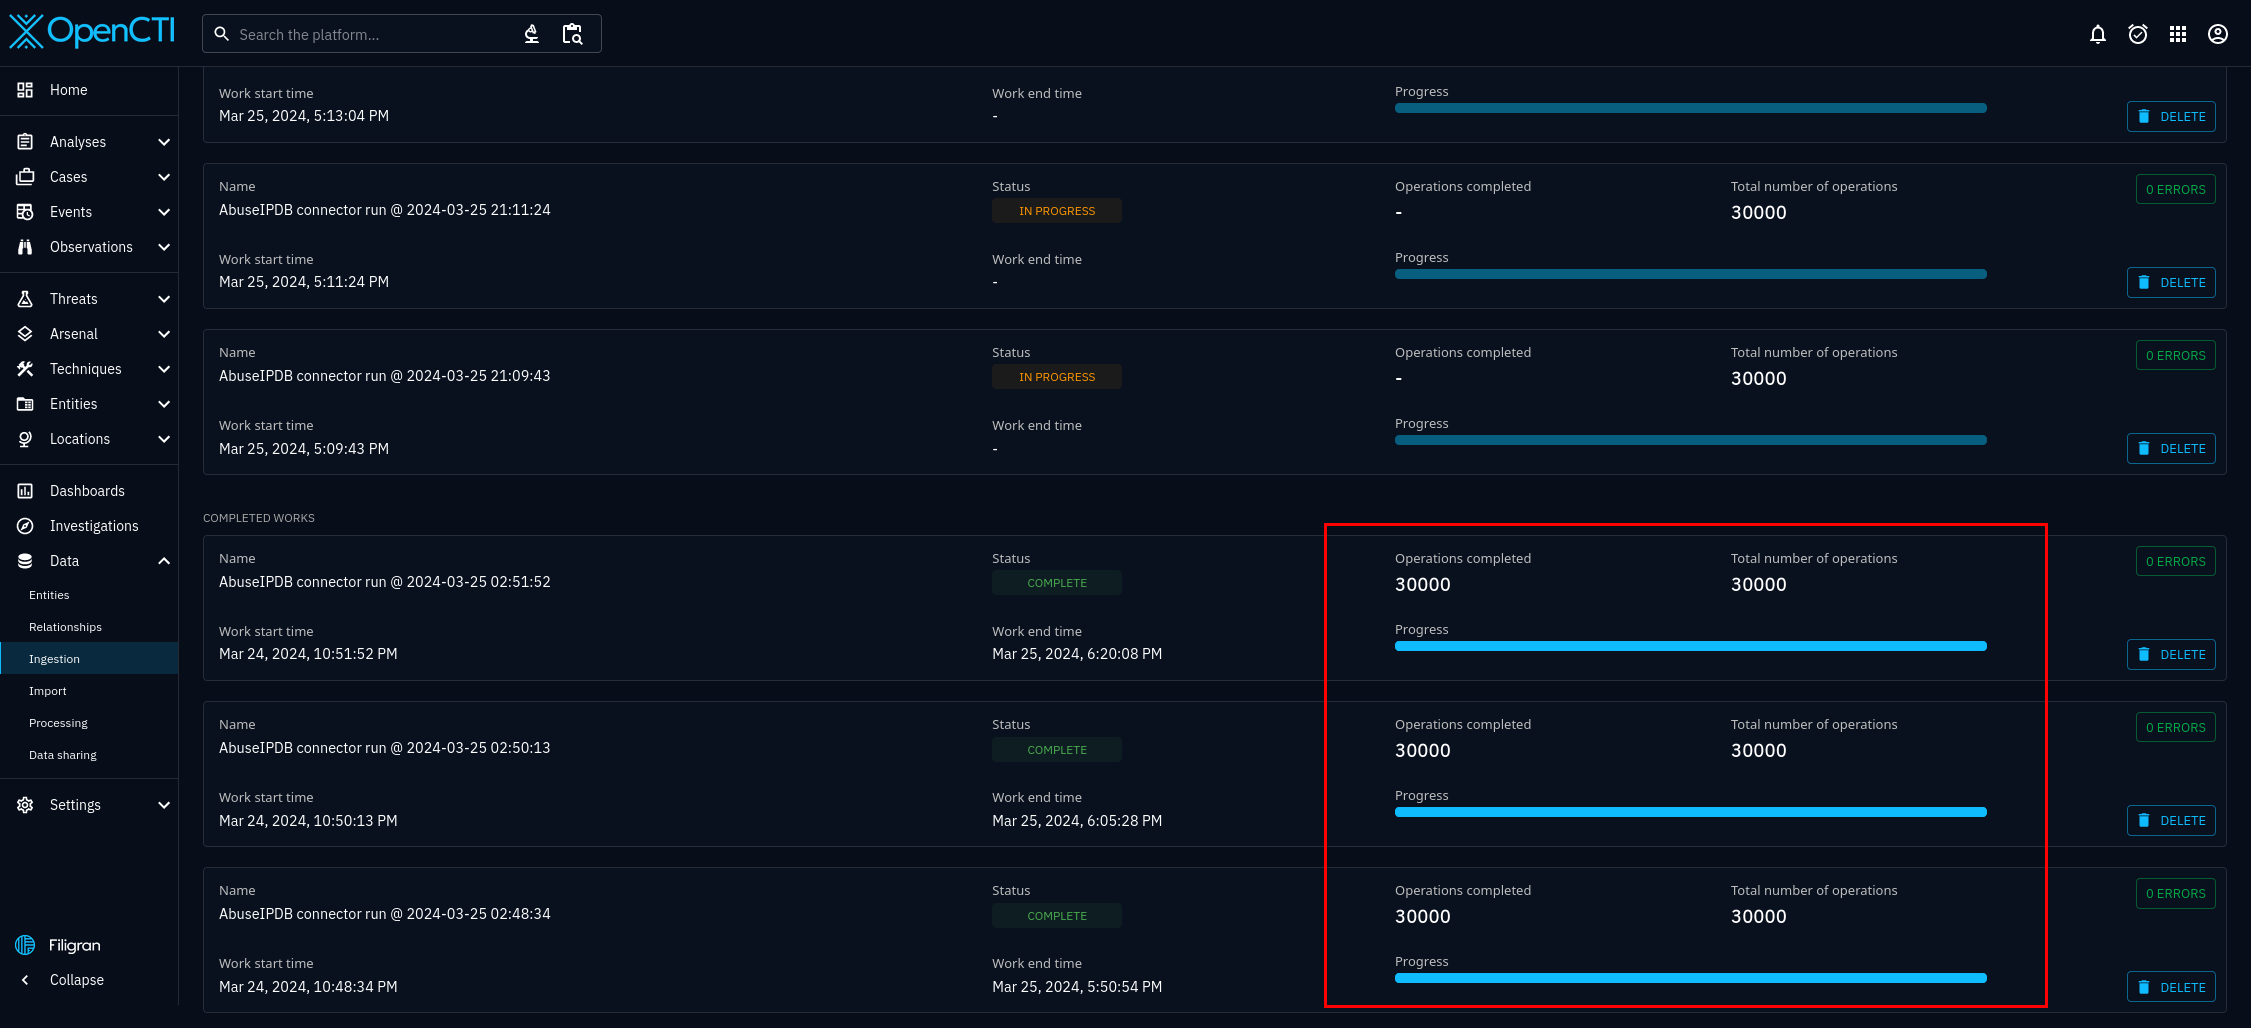
The connectors being recognized, like in figure 5, is a good sign. However, this only indicates that your connectors have connected properly. To be sure the connectors are working properly, you must click on the connectors, and see the status. If select the "AbuseIPDB IP Blacklist" connector from figure 5, you will be brought to figure 6, where you can see the status of the specific connector, including whether or not the connector is working properly. Scroll until you see bright blue status bar and status complete.
There is another way to verify functionality. Go back to the home page, look at the Observations section, from figure 7. and click on Observables.
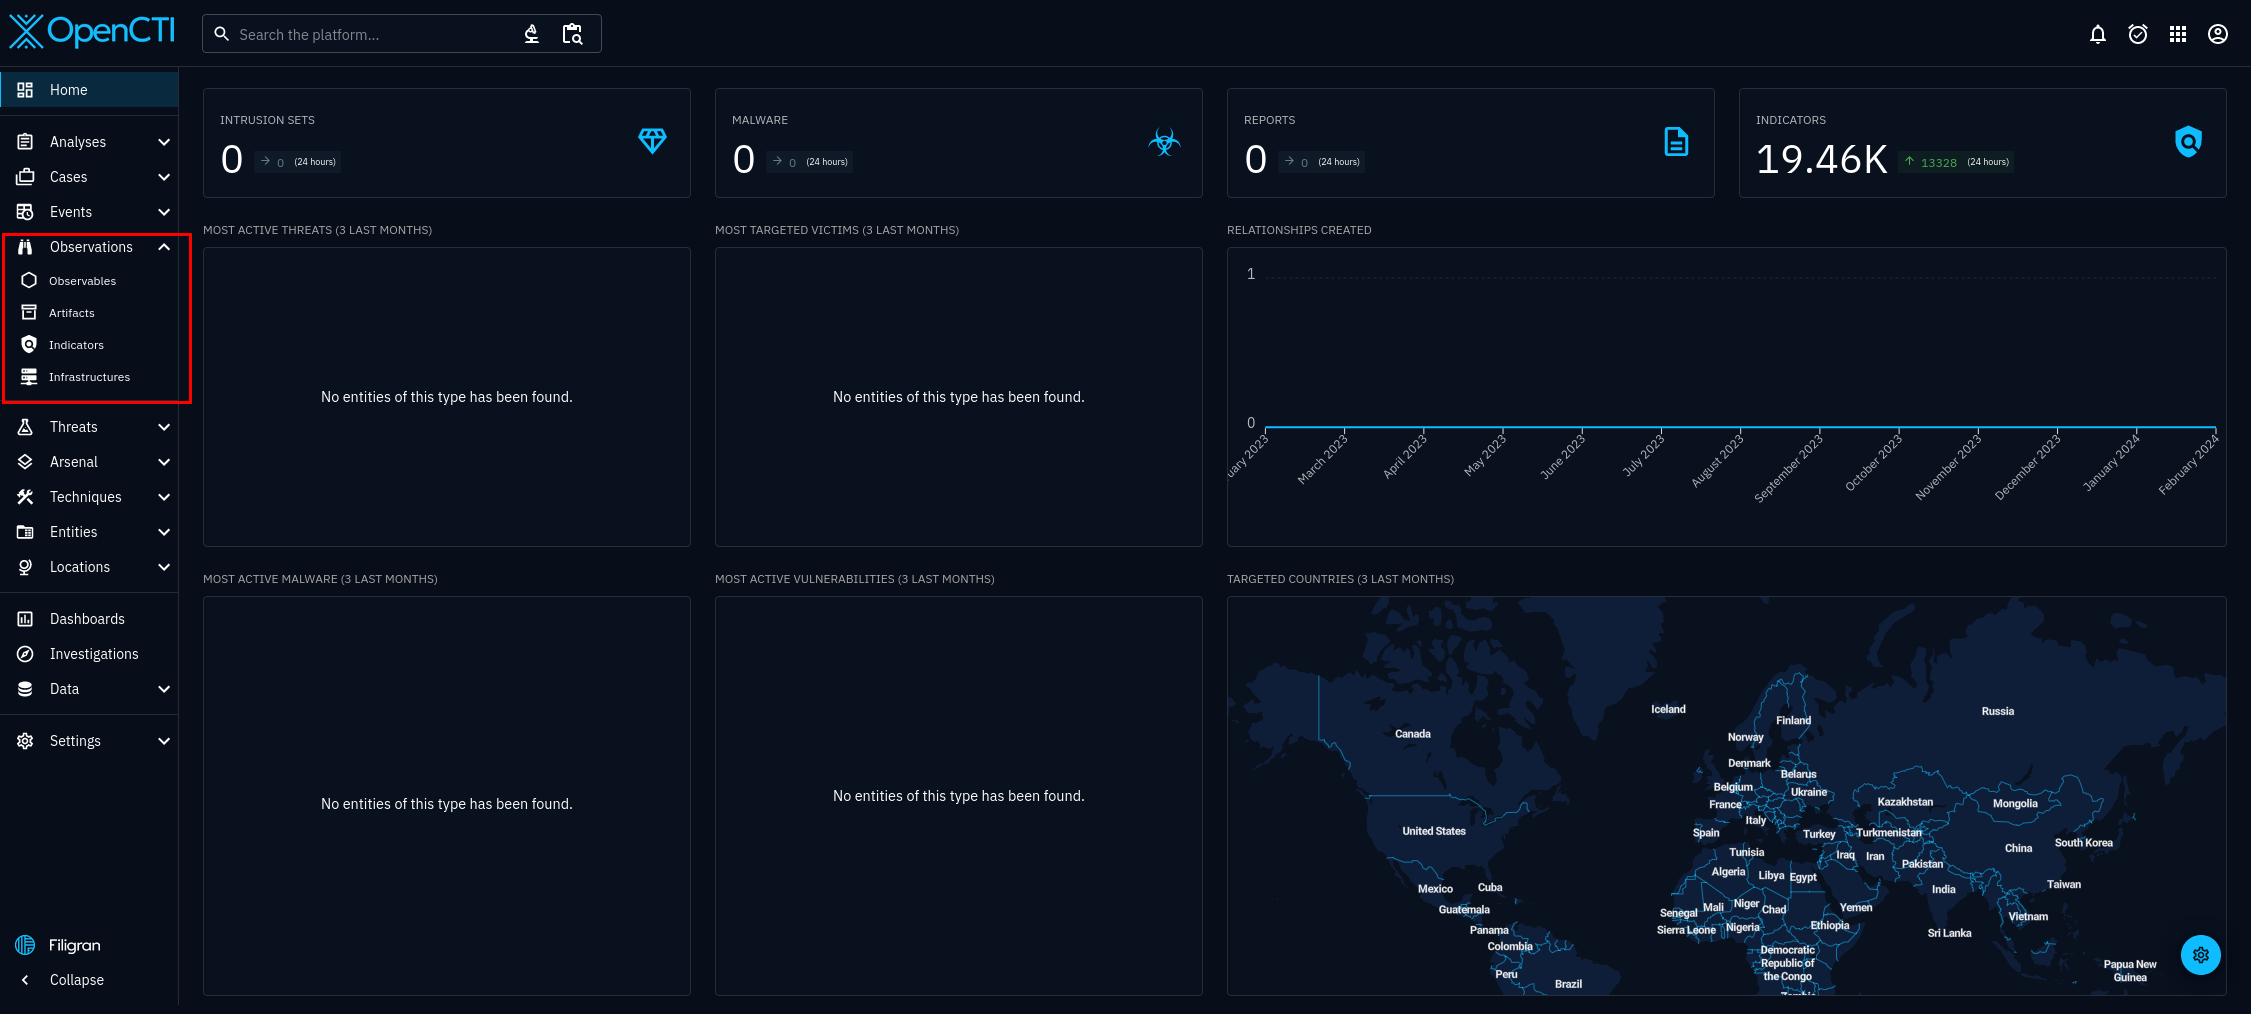
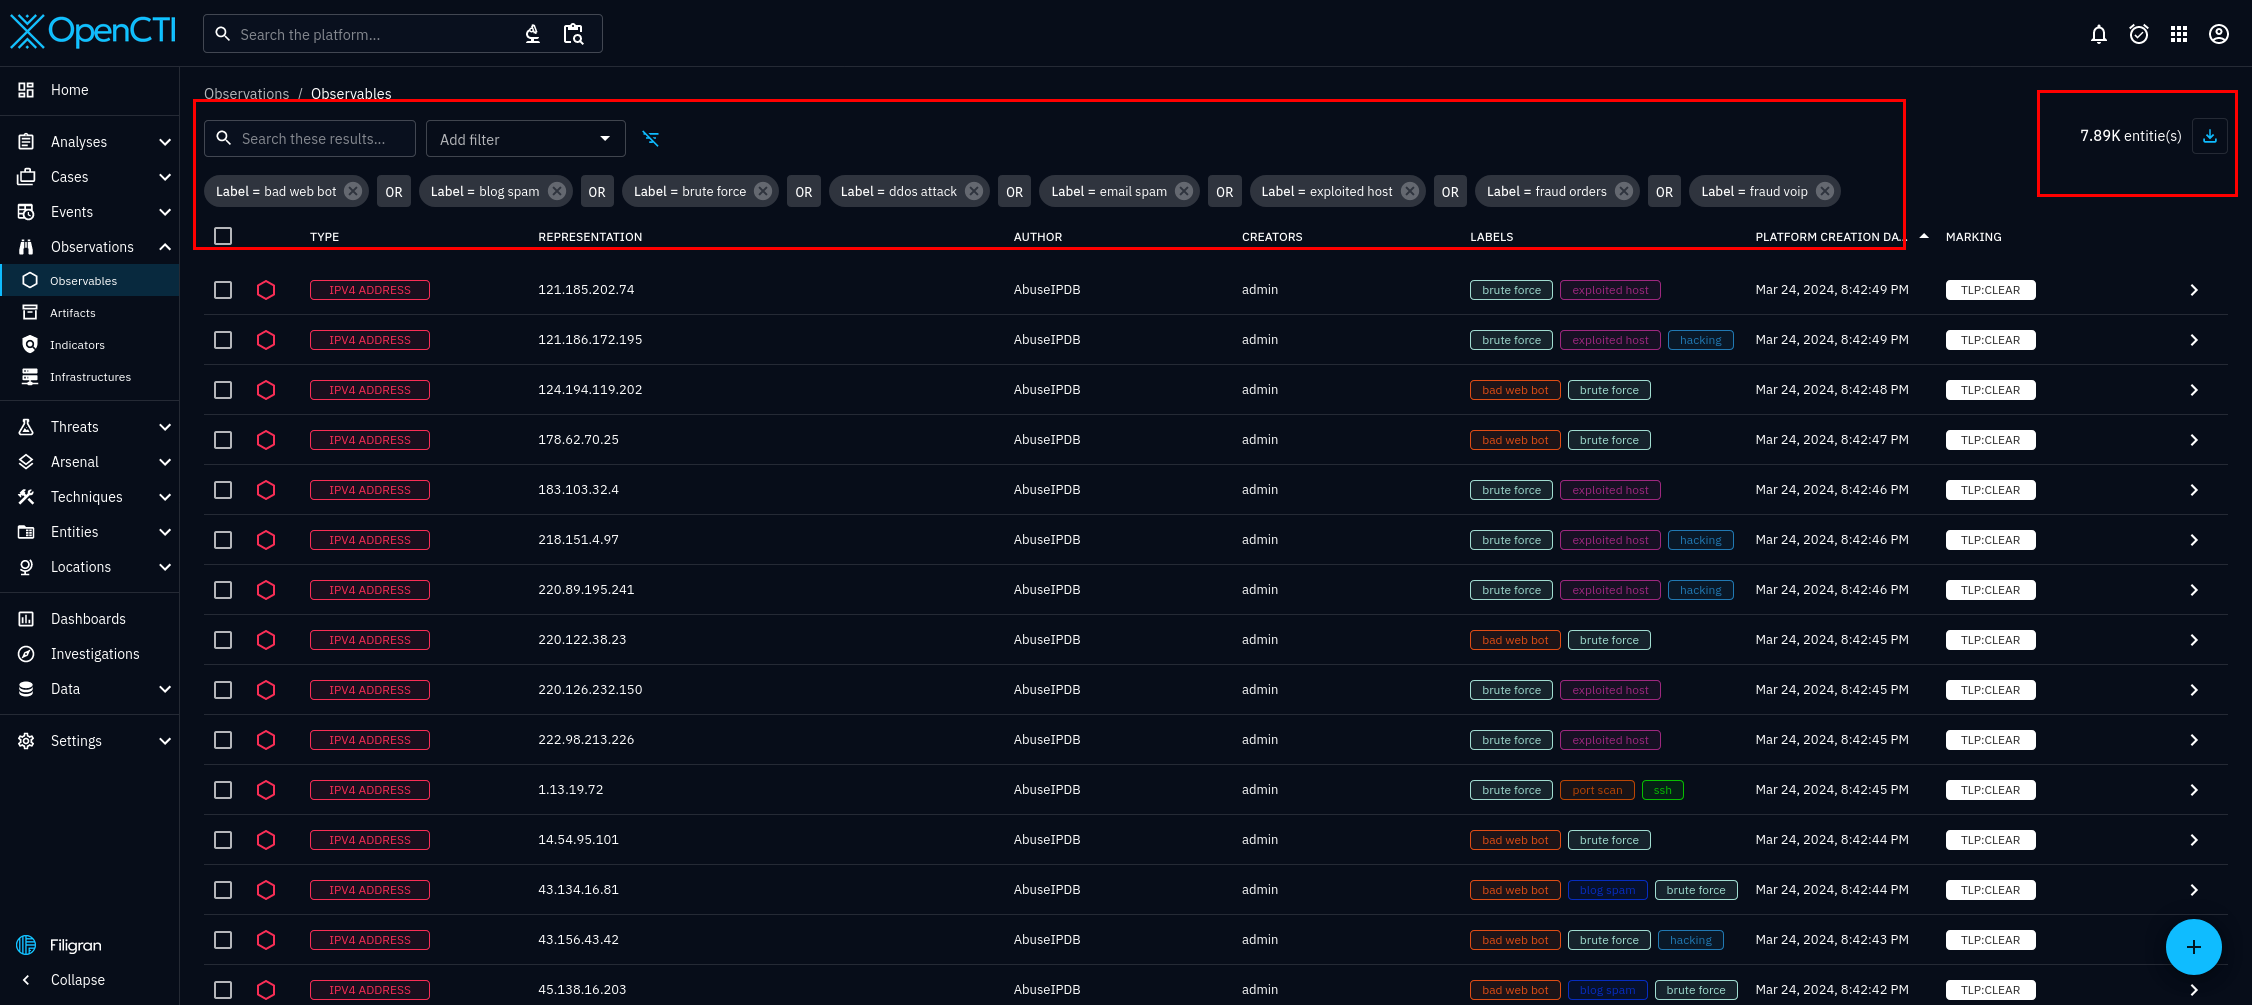
After selecting observables, you will be taken to figure 8. In figure 8, we can can see the connector is working properly. It is importing abusive IP addresses from the AbuseIPDB organization. However, the amount is dependant on how you configured the connector.
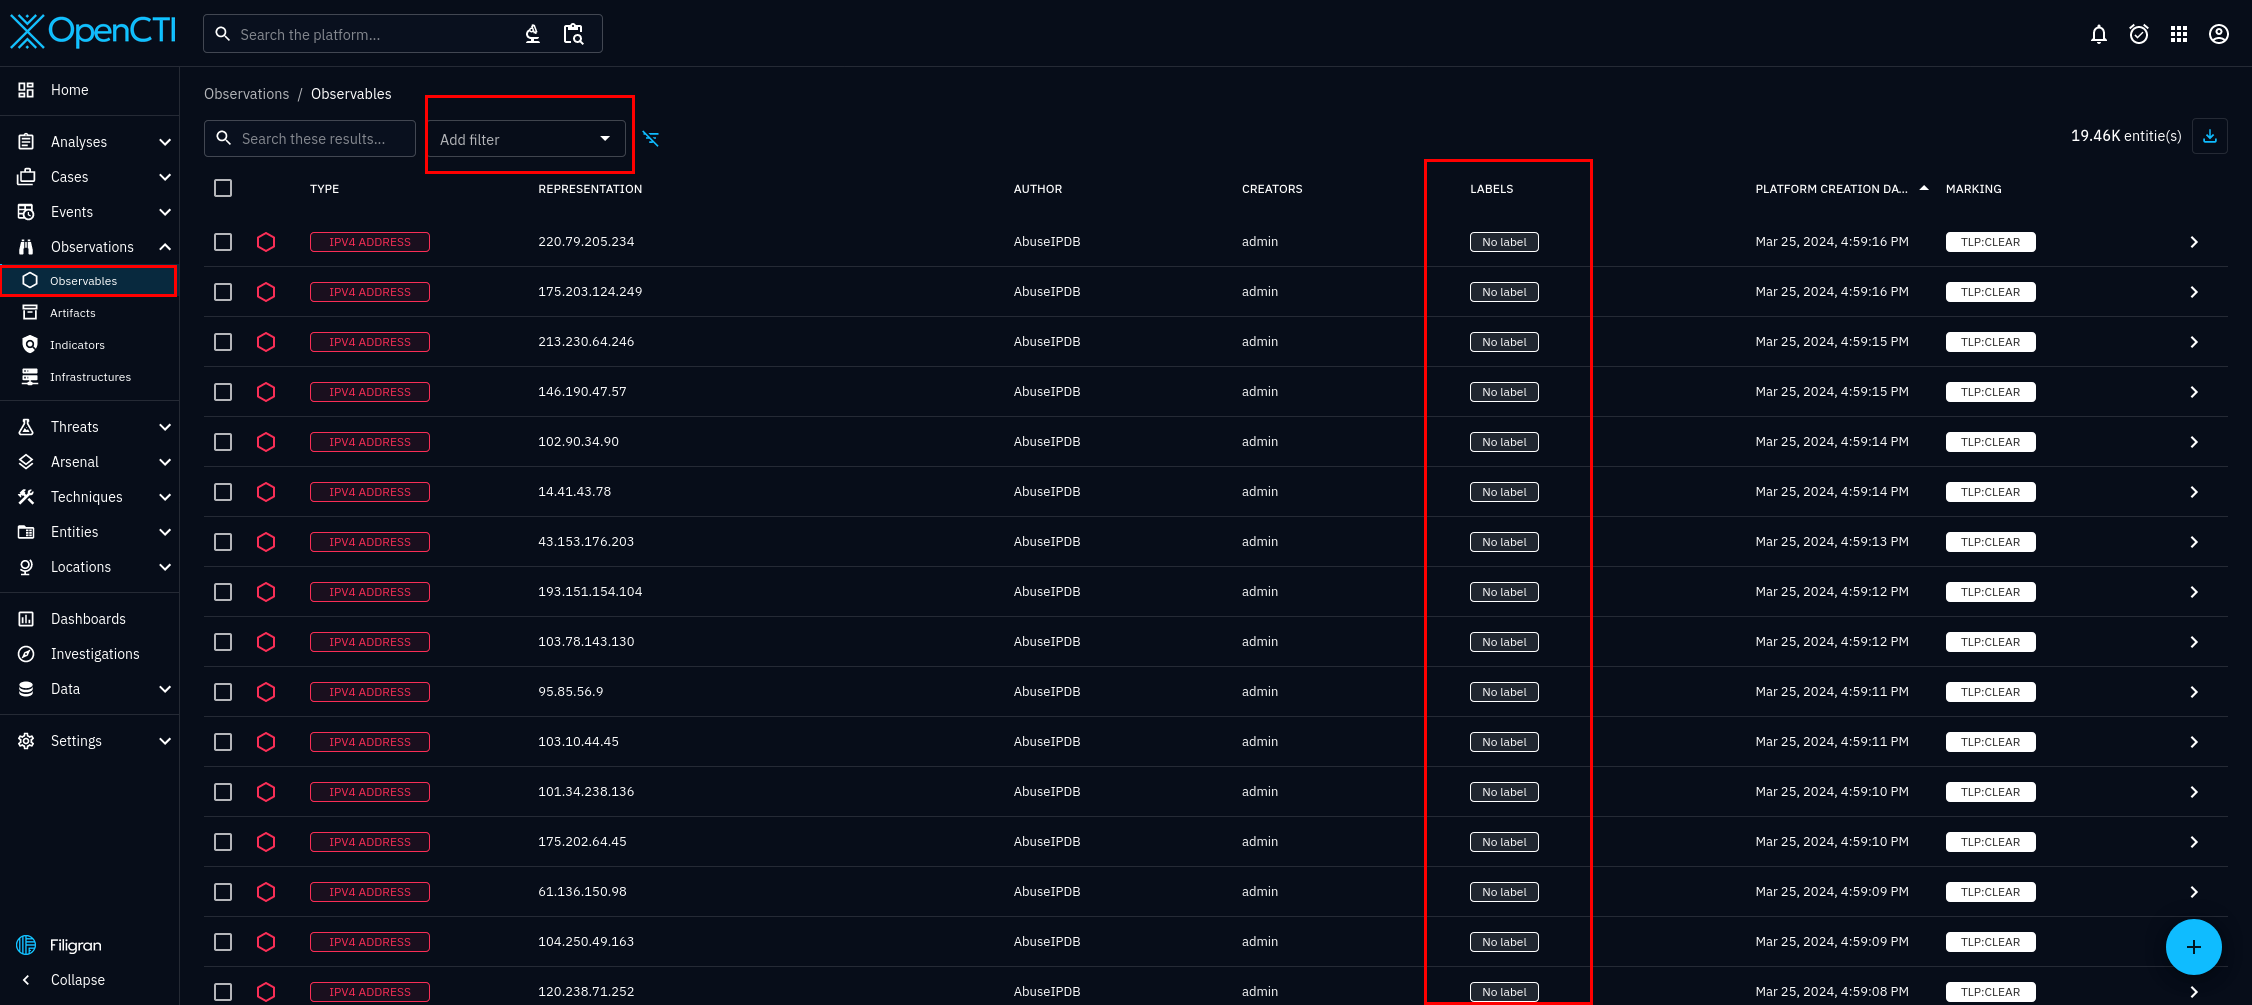
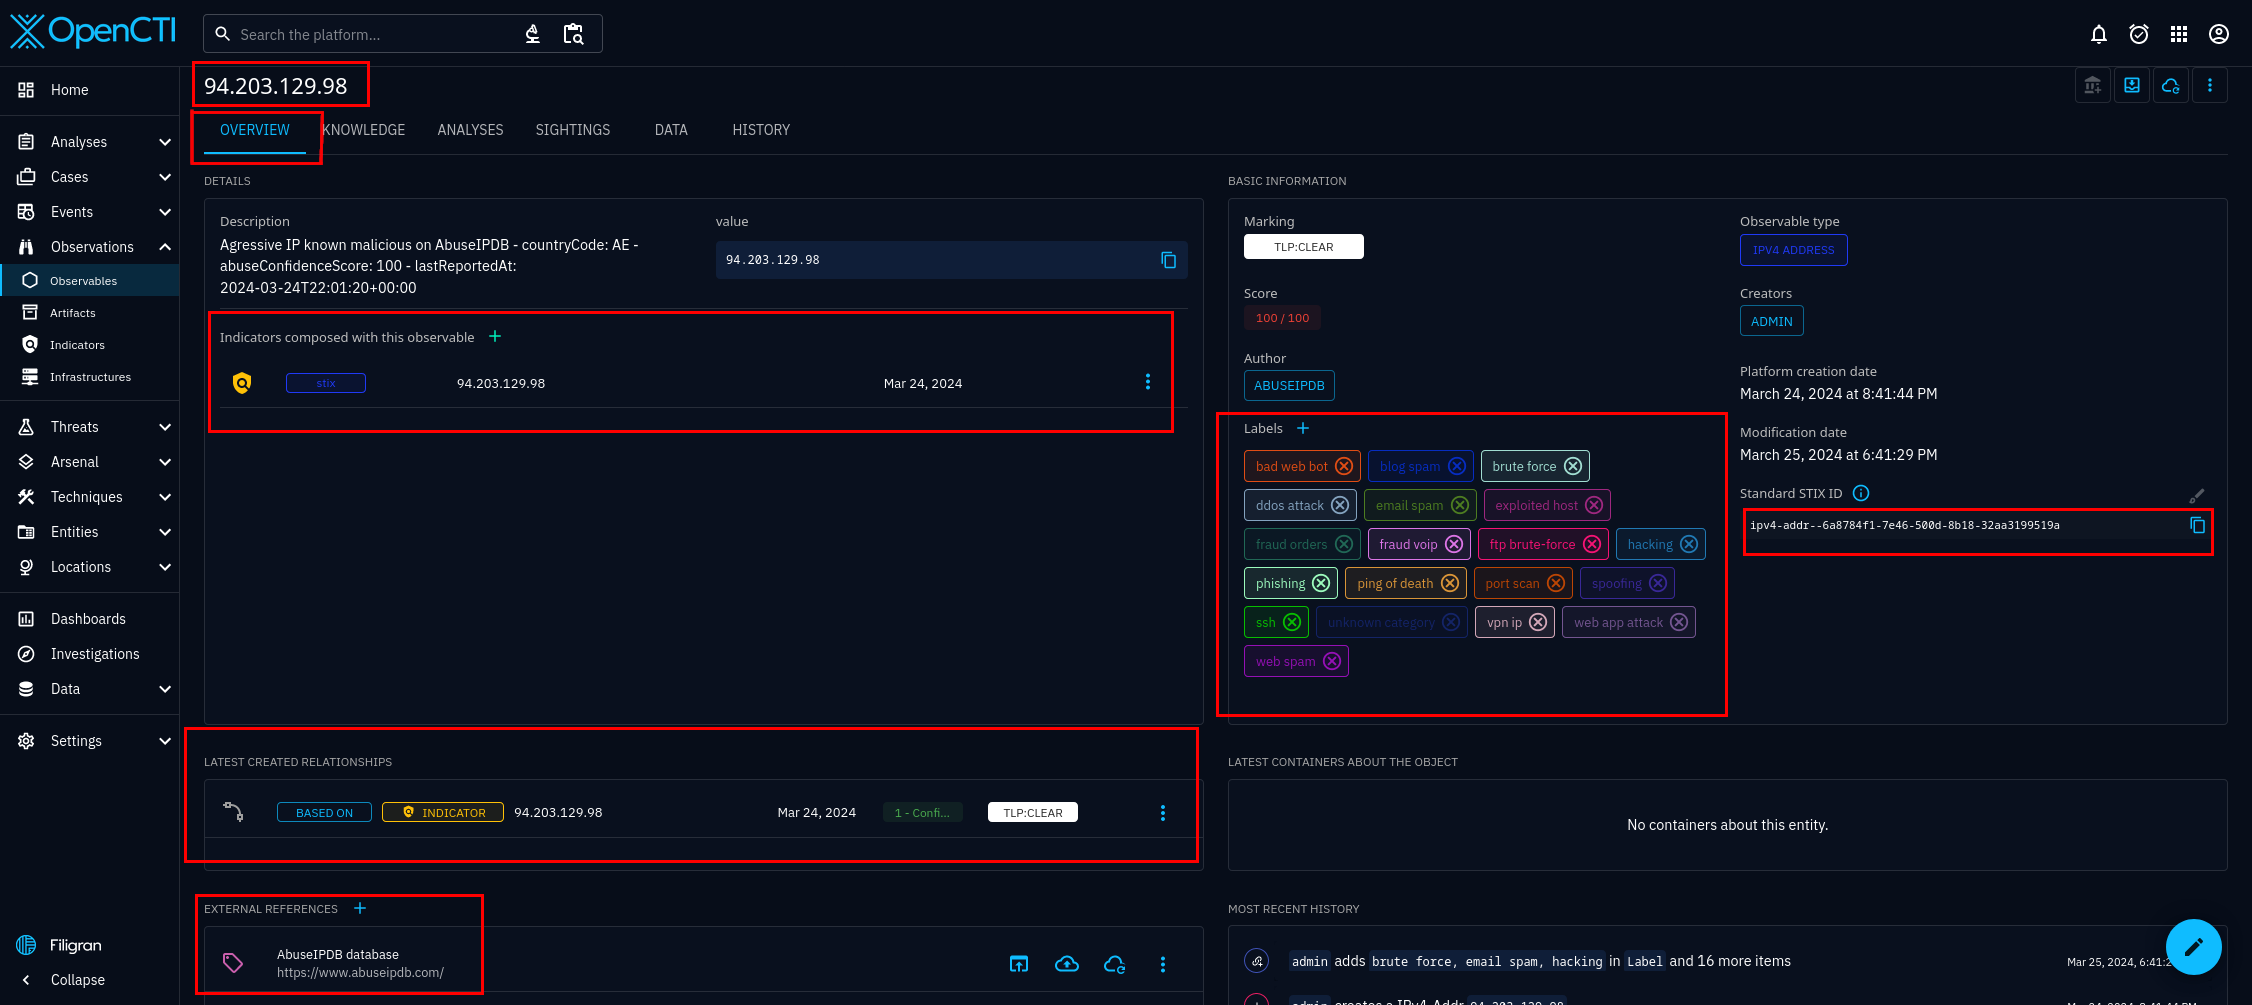
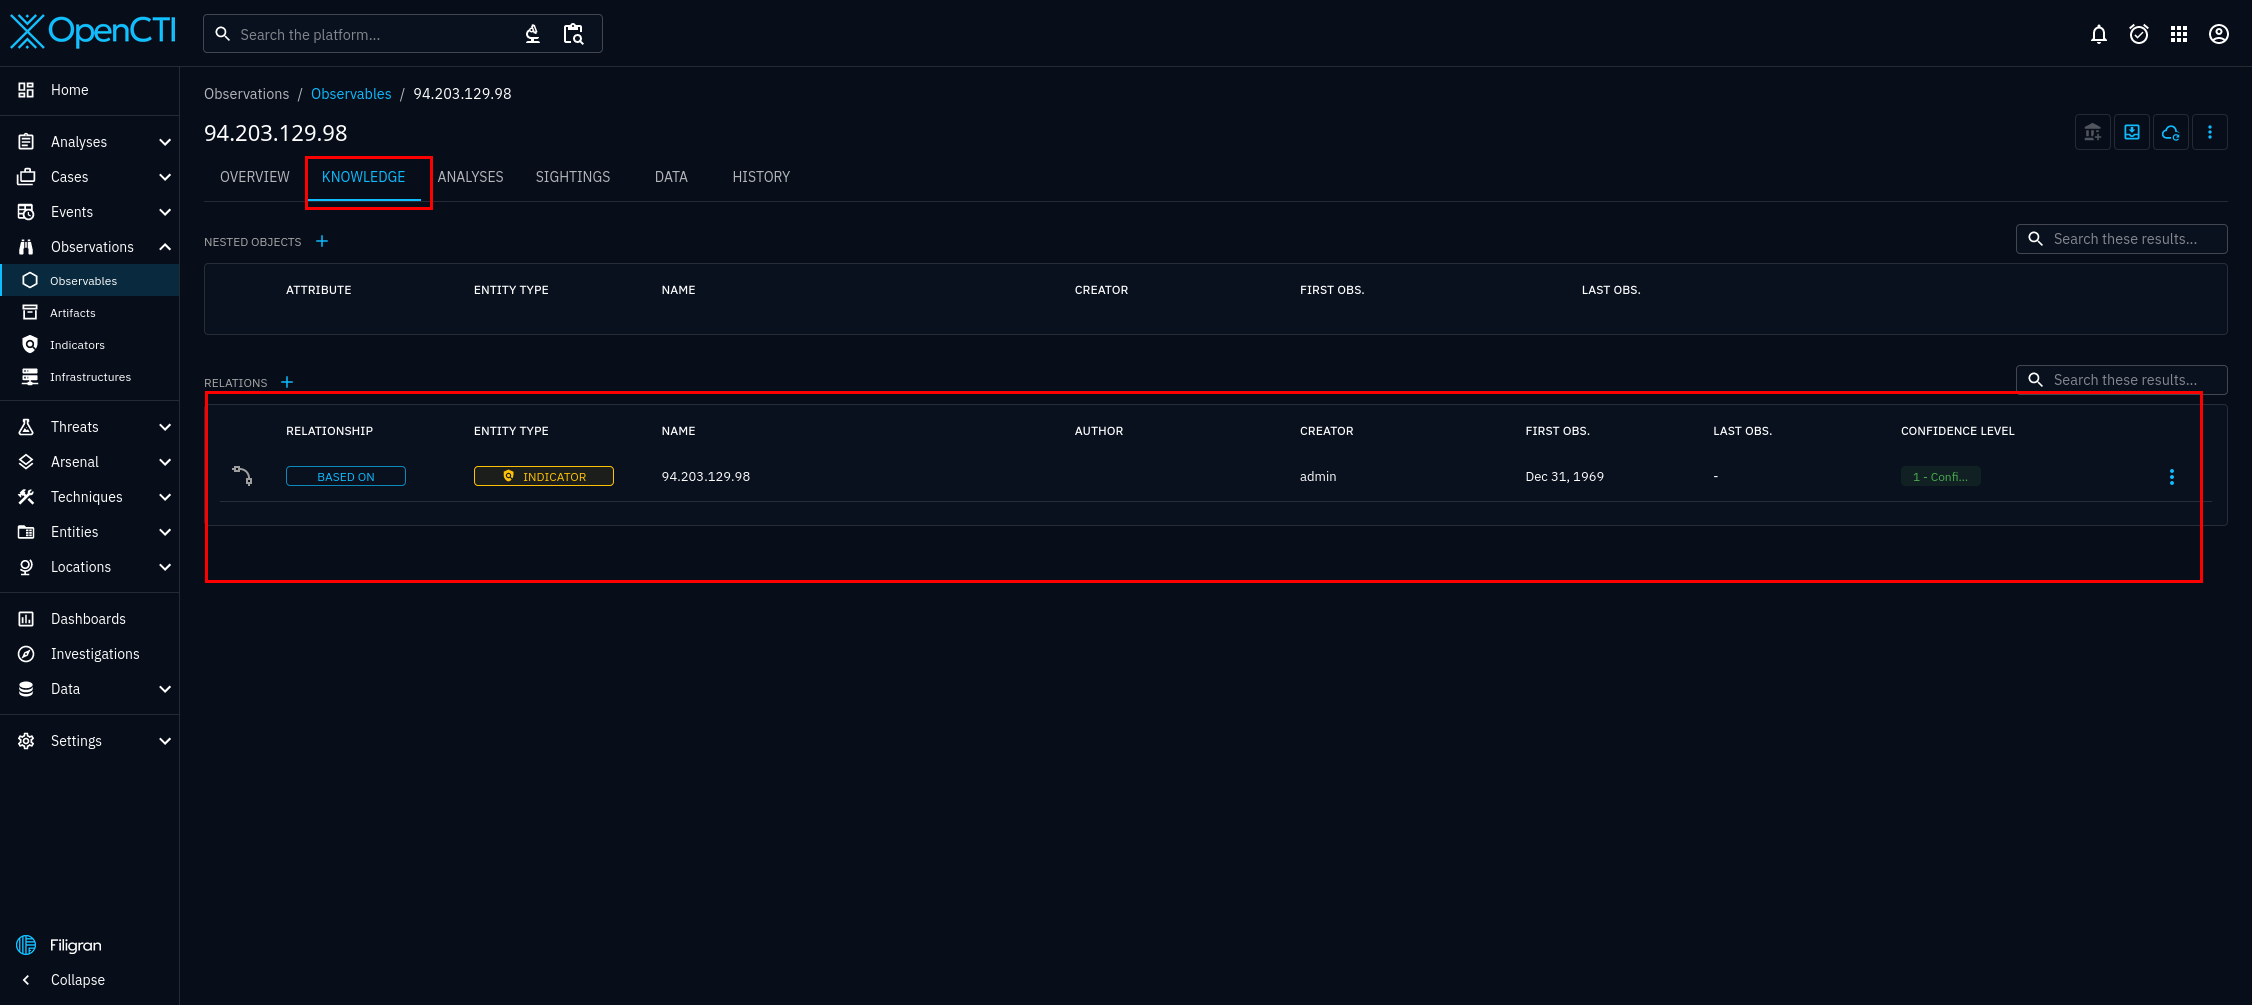
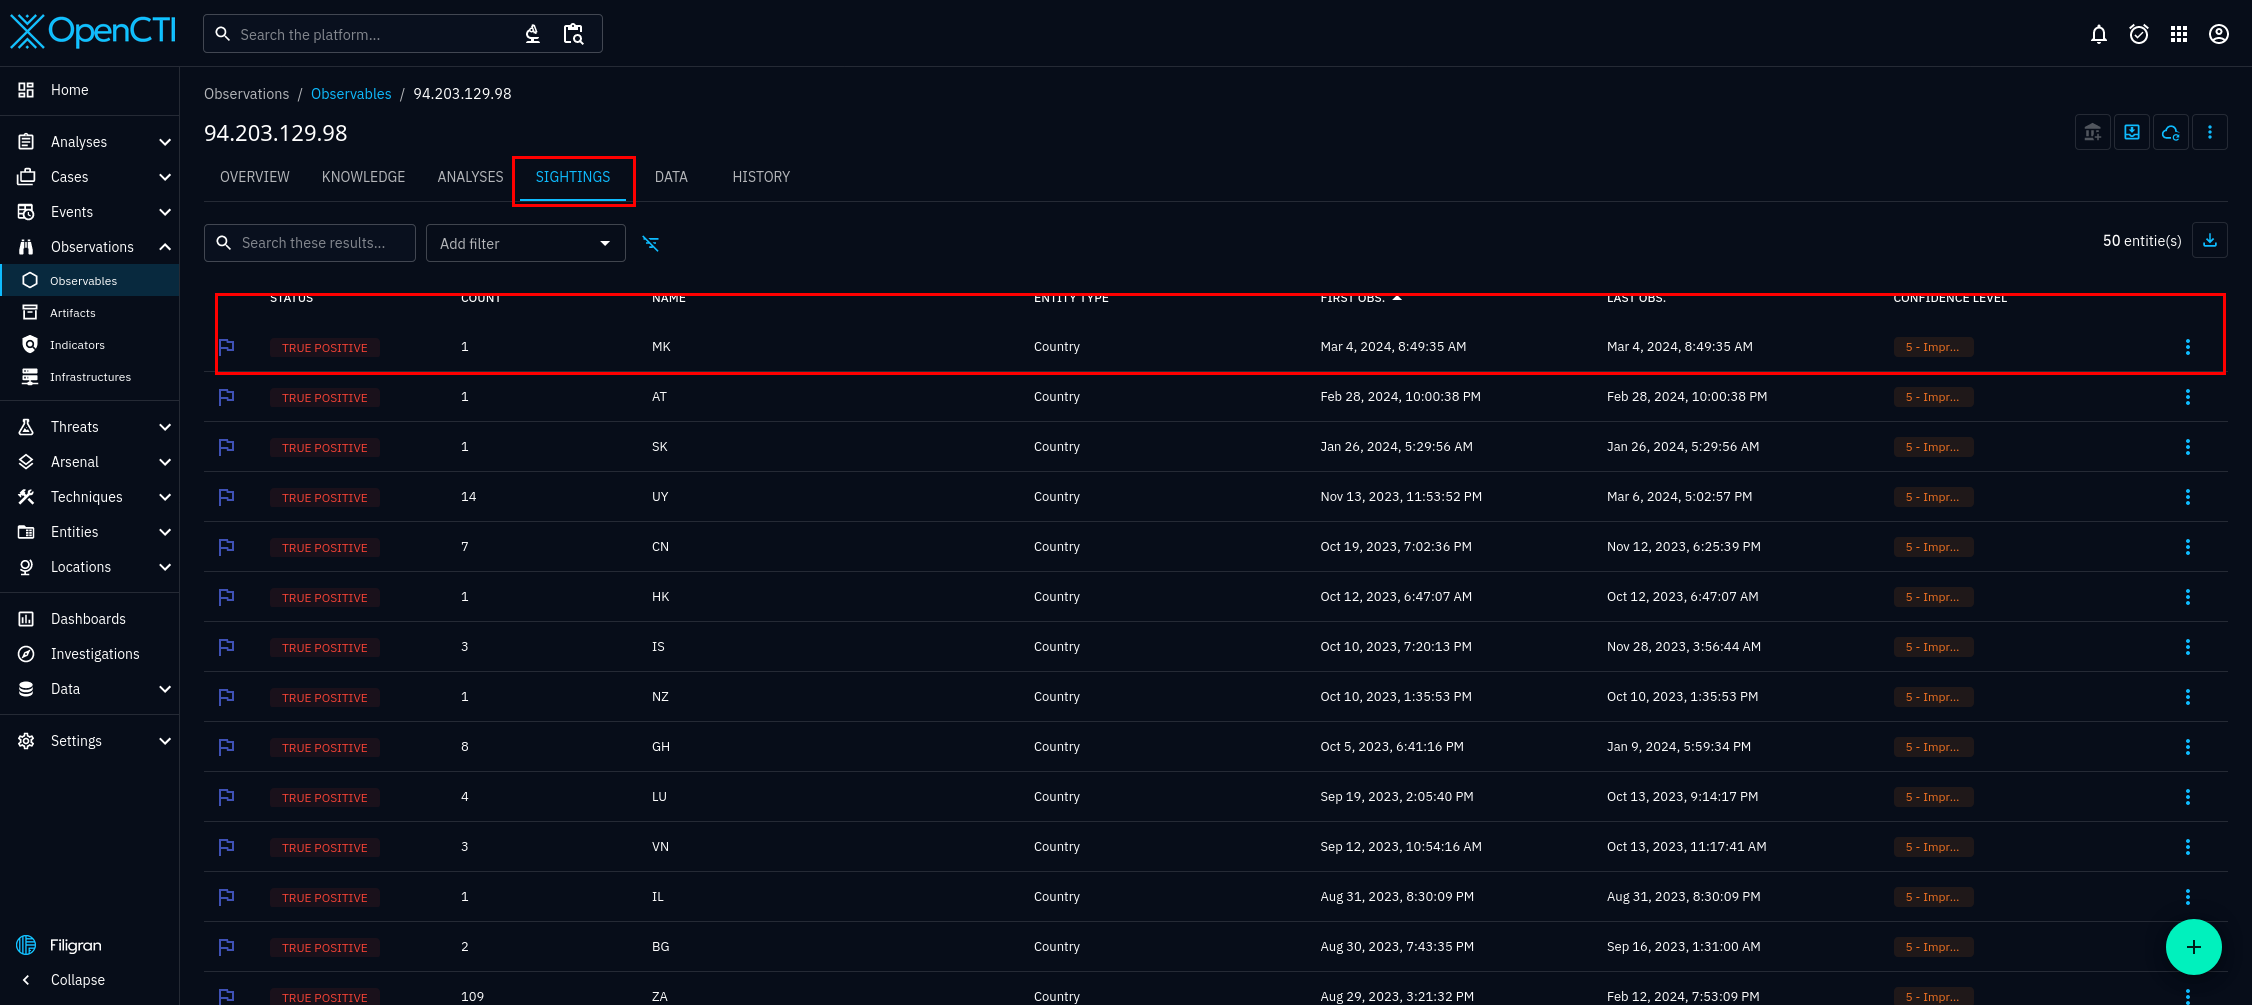
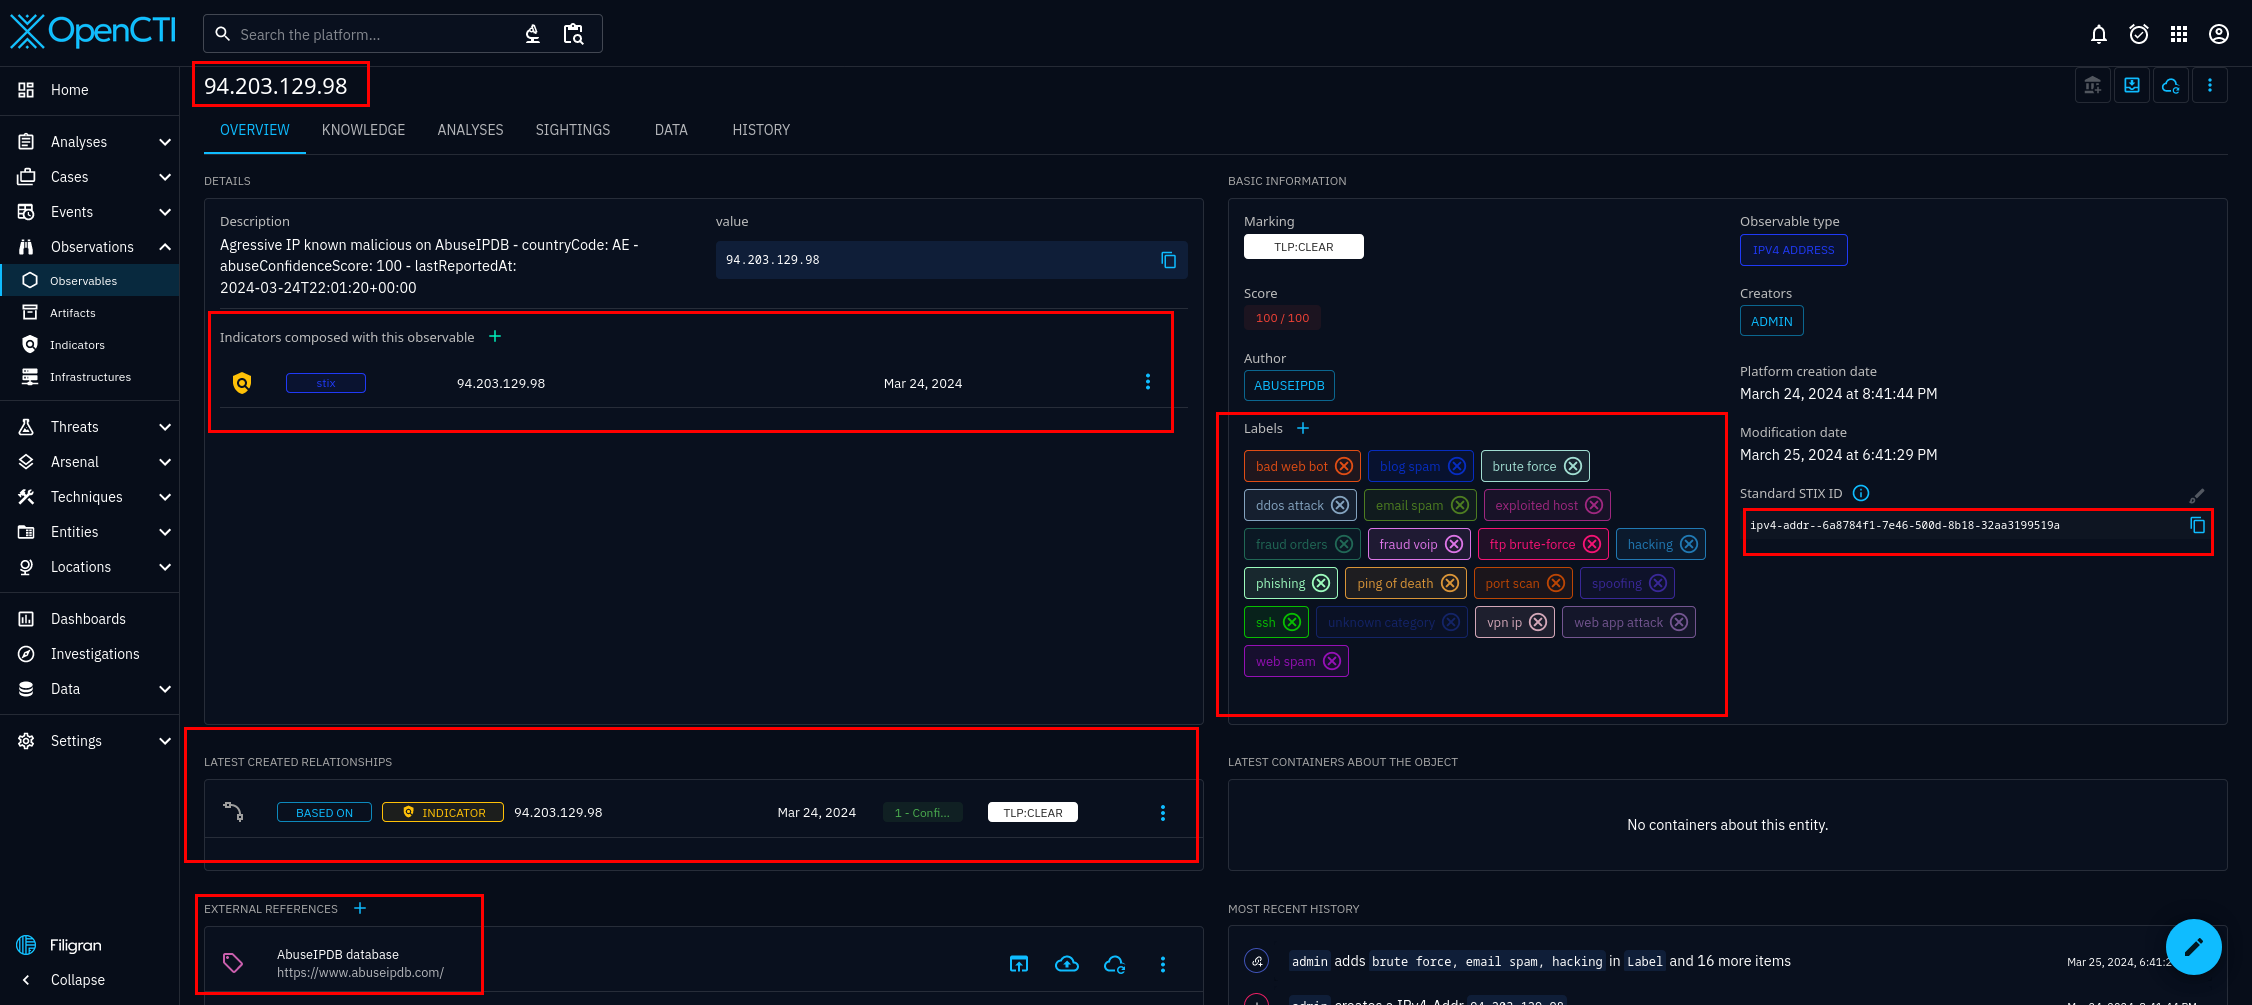
In figure 8, you can see the individual entities that the blacklist connector has imported. Select any of the entities, and you will see the details of that entity. For this tutorial we will be using the entity 94.203.129.98. I chose this IP address at random, from AbuseIPDB's list of abusive IP addresses available at the time of writing. On the dashboard, useful tabs you can see include, the overview, knowledge, and sightings tab. They are figures 9, 10, and 11 respectively.
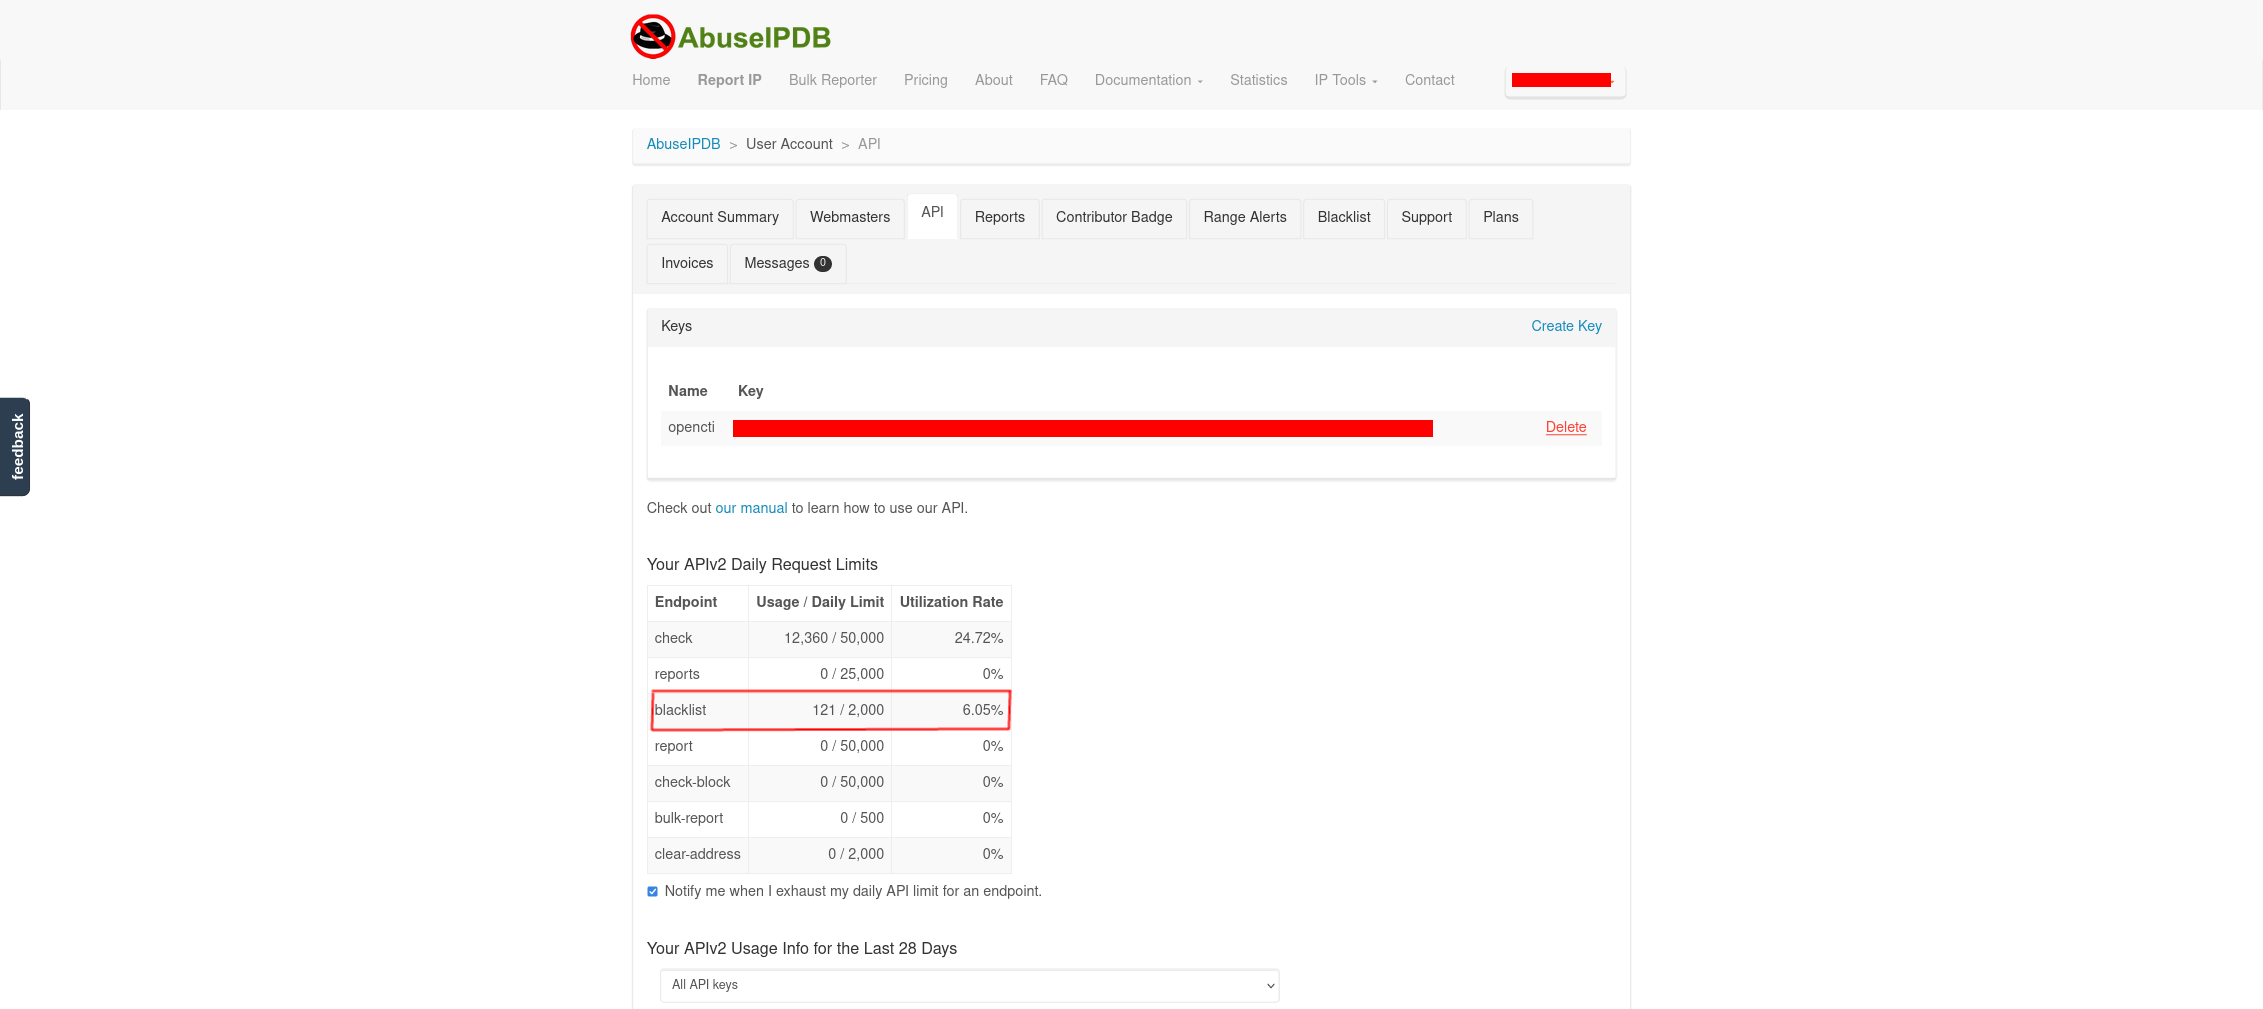
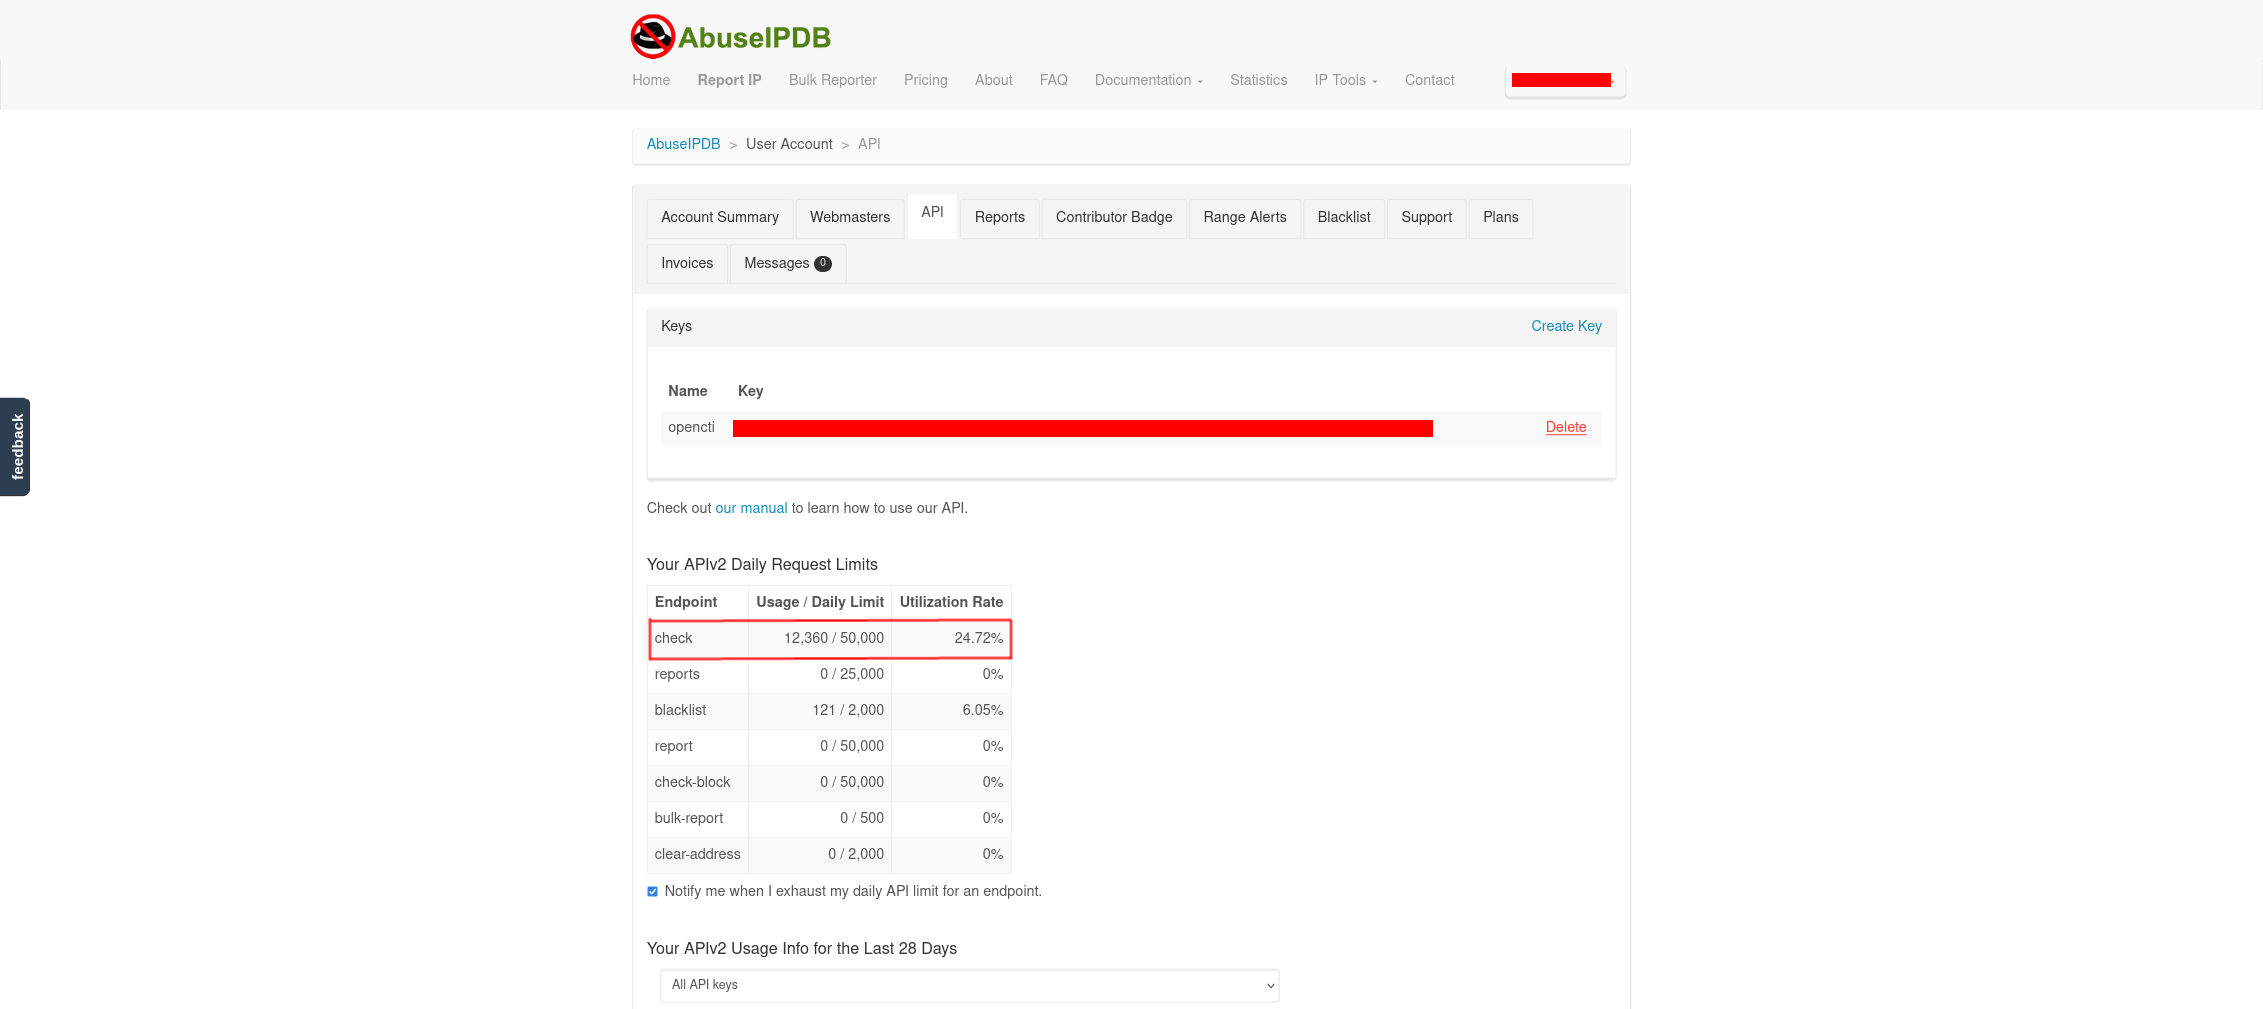
Another way to verify the connector is working is to login to your AbuseIPDB account, observe if the number of calls is increasing. See figure 12.
7.) Configure the AbuseIPDB Check internal-enrichment OpenCTI connector
The source code can be found in the official OpenCTI connectors repository, AbuseIPDB internal-enrichment connector.
The internal-enrichment connector is used to enrich existing data in OpenCTI with information from external sources. The internal-enrichment connector runs checks against the AbuseIPDB check endpoint, and can be used to check the reputation of any IP address already present in OpenCTI. This connector will automatically and systematically work through all the OpenCTI objects, and update their threat scores based on the information retrieved from AbuseIPDB.
        connector-abuseipdb:
          image: opencti/connector-abuseipdb:latest
          environment:
            - OPENCTI_URL=http://opencti:8080
            - OPENCTI_TOKEN=${OPENCTI_ADMIN_TOKEN}
            - CONNECTOR_ID=${CONNECTOR_ABUSEIPDB_ID} # Valid UUIDv4
            - CONNECTOR_NAME=AbuseIPDB
            - CONNECTOR_TYPE=INTERNAL_ENRICHMENT
            - CONNECTOR_SCOPE=IPv4-Addr
            - CONNECTOR_AUTO=true
            - CONNECTOR_CONFIDENCE_LEVEL=100 # From 0 (Unknown) to 100 (Fully trusted)
            - CONNECTOR_LOG_LEVEL=error
            - ABUSEIPDB_API_KEY=${ABUSEIPDB_API_KEY}
            - ABUSEIPDB_MAX_TLP=TLP:AMBER
          restart: always
          depends_on:
            - opencti
8.) Post-Installation and Running the AbuseIPDB Check internal-enrichment OpenCTI connector
To begin, go to the login screen of your OpenCTI platform, enter your credentials. The credentials used here will be the same as the credentials in your .env and docker-compose.yml files.
Once you have logged in, you will be taken to the OpenCTI dashboard.
Your dashboard can look as complex as the above image, or as simple as the below image. The connectors will work either way.
To verify the connectors are working, select, Data > Ingestion. See Figure 15.
Select connectors, it is the fourth option, on the right hand side. See figure 16.
Check whether "AbuseIPDB" connector is listed. The name may be different, since it will match whichever name you gave in the docker-compose.yml, or .env file. See figure 17.
If you click on the "AbuseIPDB" connector from figure 17, you are brought to figure 6, where you can see the status of the connector, including whether or not the connector is working properly. Scroll until you see bright blue status bar and status complete. If you see this, your connector is configured and working properly. If you do not see this status, refer to the Troubleshooting Connectors With Docker section.
Another way to verify the internal-enrichment connector is working, is to go back to the dashboard, figures 13 and 14, and take the path Observations > observables, on the left hand side menu. Then, simply try and filter by label. See figure 28. All your IPv4 and IPv6 objects should updating. If the external-import connector is working, you will see the same tags for the observables, that you see in AbuseIPDB. For example, 94.203.129.98 in OpenCTI, and AbuseIPDB will now have the same tags. You cannot filter by every tag on AbuseIPDB. The tags defined by the connector code itself, are the only tags that can be searched in OpenCTI. To remedy this, you would need to extend the connector through python, the pycti module, and the AbuseIPDB API.
Select any of the entities from figure 19, and be brought to the details of that entity, or figure 20. You know the check endpoint is being called, returning data in the proper format, and is being ingested into OpenCTI, when you see entities with labels like figure 20. Keep in mind the internal-enrichment connectors will often be behind your external-import connectors. This mismatch often happens because internal-enrichment connectors will go through entities one by one, and external-import connectors can bring in tens of thousands of entities every minute.
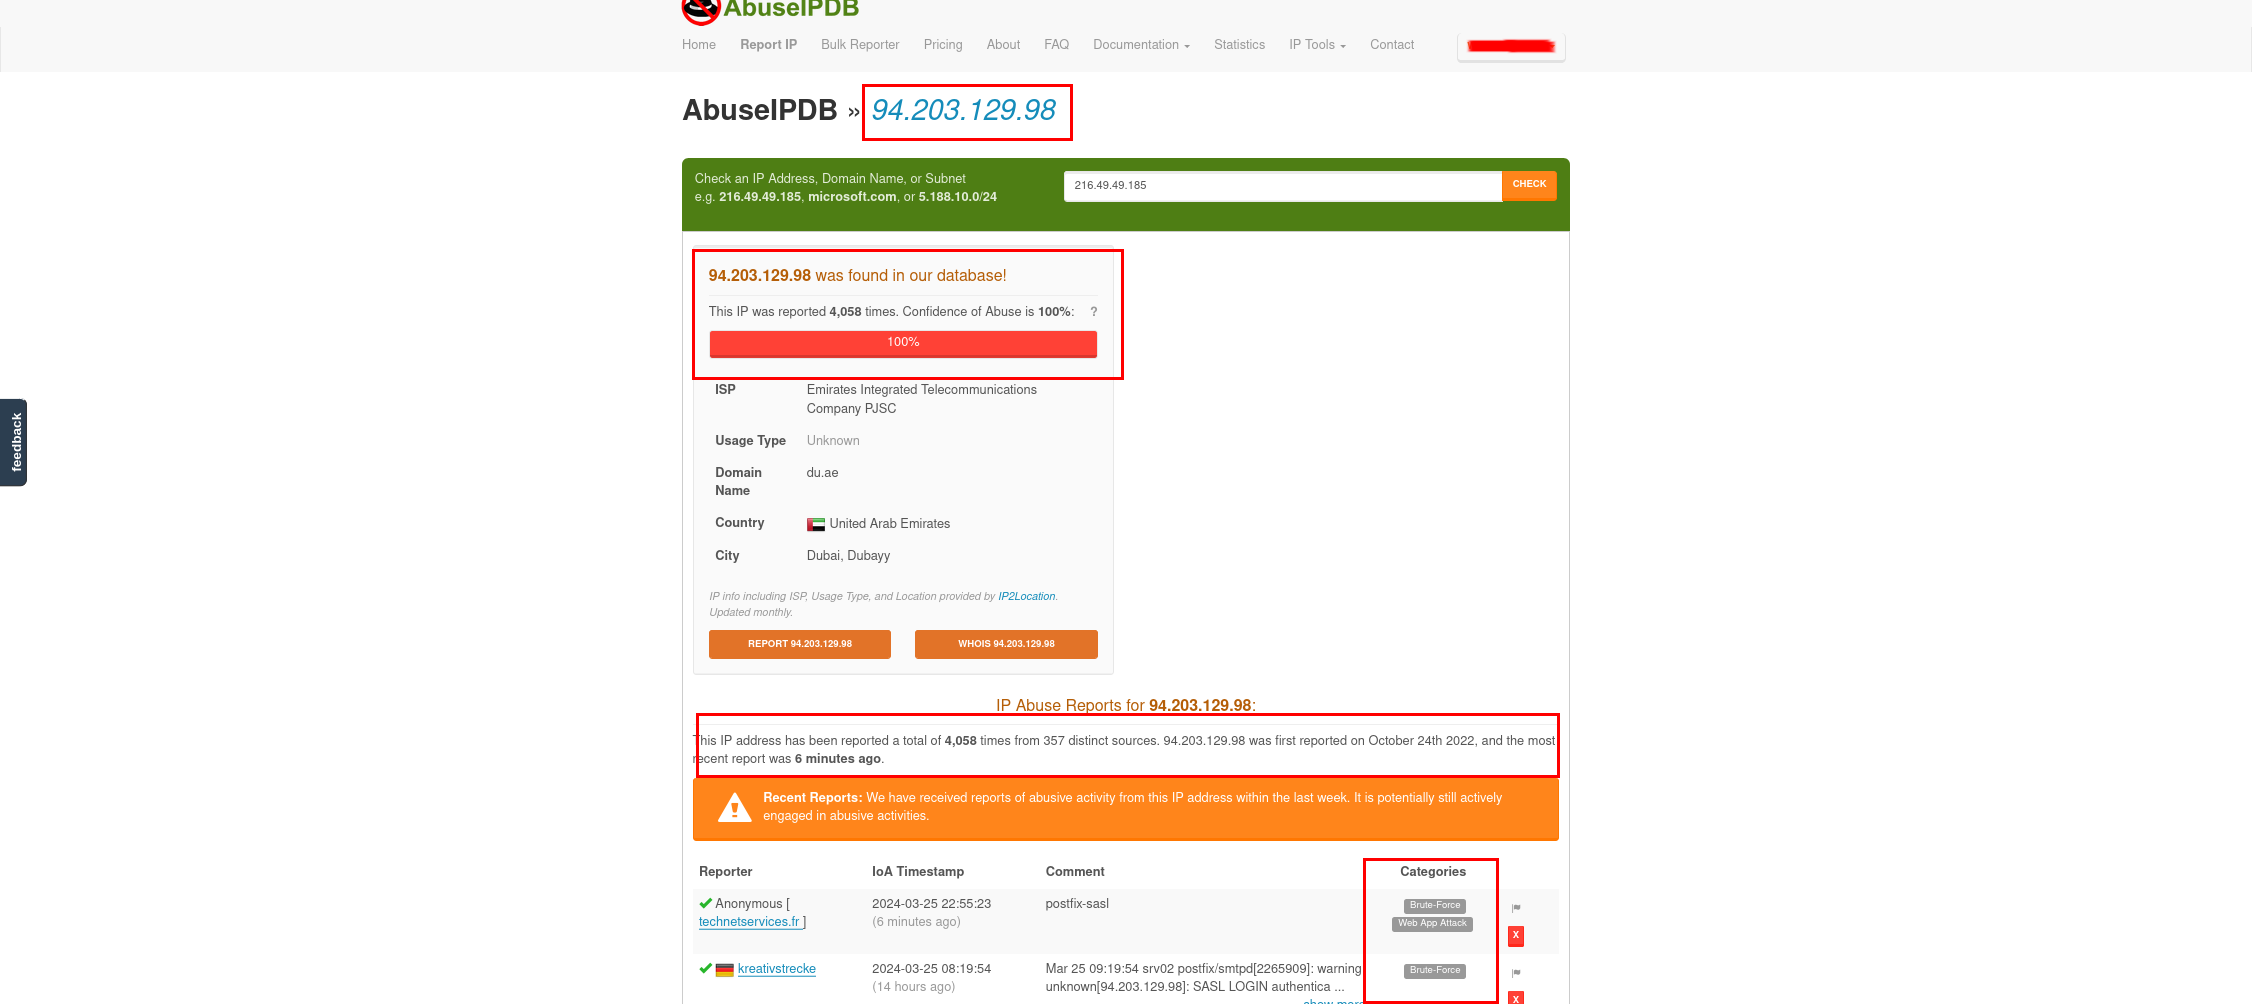
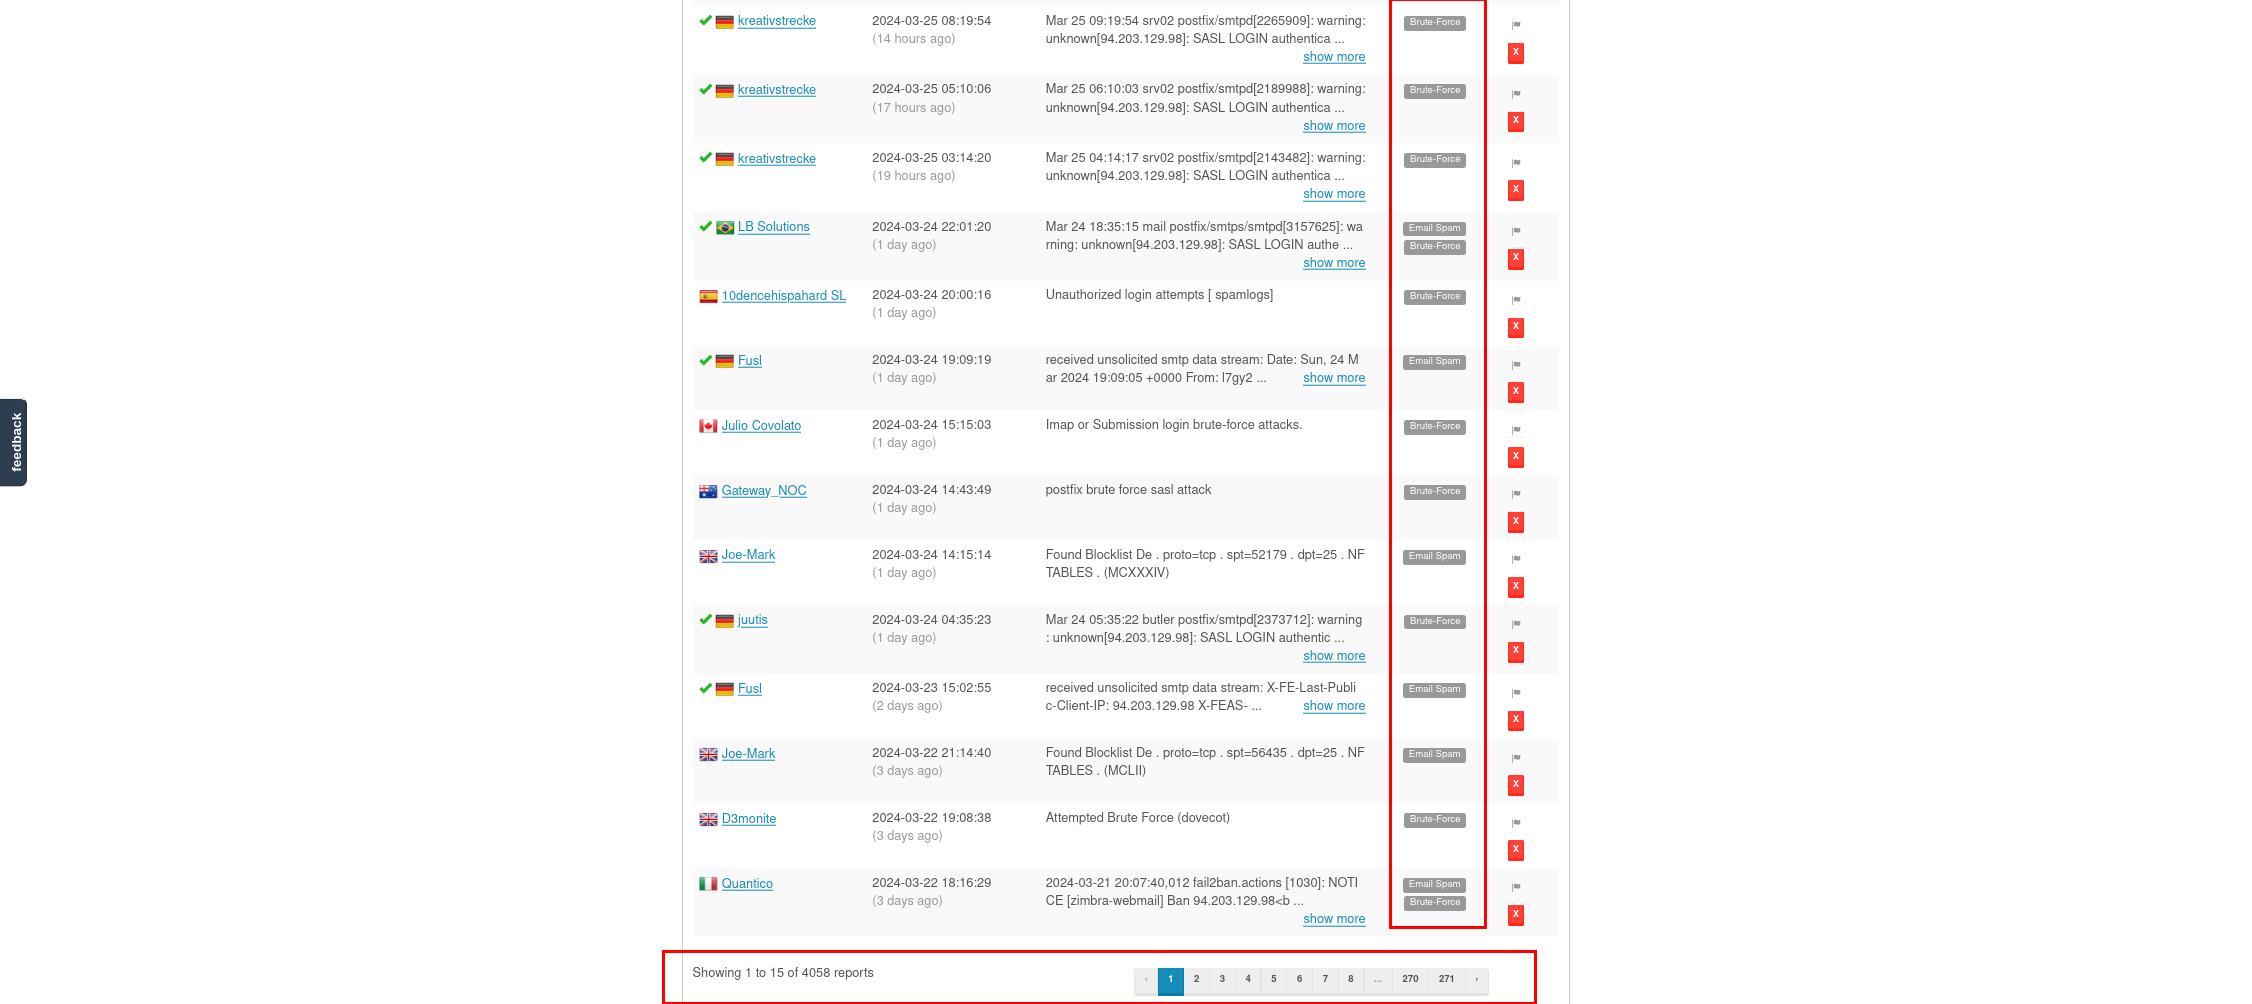
On AbuseIPDB you can observe that the tags given to the earlier observable, indicator, and entity, our example was 94.203.129.98, will match the tags from 4058 reports, from 357 distinct sources, with the latest report being 6 minutes old! Now all this invaluable data from AbuseIPDB is in your OpenCTI instance.
Another way to verify the connector is working is to check your AbuseIPDB account, and just visibly check if the number of calls is increasing.
9.) Troubleshooting Connectors With Docker
When using OpenCTI connectors in Docker Containers, you may encounter issues related to network connectivity, API key authentication, or data processing. Here are some common troubleshooting steps:
- Ensure that the connector's environment variables are correctly set in the docker-compose.yml file and the .env file.
- Check the network configuration in the docker-compose.yml file to ensure that the connector can communicate with the OpenCTI platform and external APIs like AbuseIPDB.
- Verify that the API keys for AbuseIPDB and OpenCTI are valid and correctly set in the environment variables.
- Monitor the connector logs using the Docker logs command to identify any errors or issues during data processing.
- Check the connector code for any bugs or misconfigurations that may be causing the problem.
- Consult the official OpenCTI documentation and connector-specific guides for troubleshooting tips and best practices.
10.) Conclusion
Integrating AbuseIPDB with OpenCTI provides a powerful combination of threat intelligence sources and analysis capabilities. By leveraging AbuseIPDB's extensive IP reputation data and OpenCTI's robust threat intelligence platform, organizations can enhance their cybersecurity posture, improve threat detection and response, and gain valuable insights into malicious activities targeting their networks.
For more information on OpenCTI and AbuseIPDB, visit their official websites:
For more information on the STIX and TAXII standards, visit the official OASIS websites:
11.) Page Feedback
If you have any feedback or questions about this page, please contact us, and let us know. We are always looking to improve the content and resources we provide to our users.